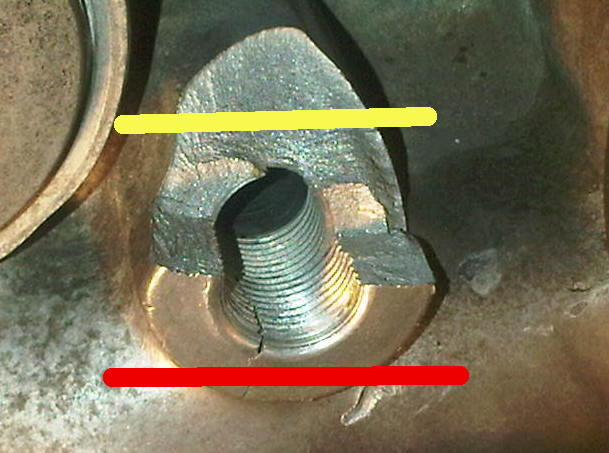
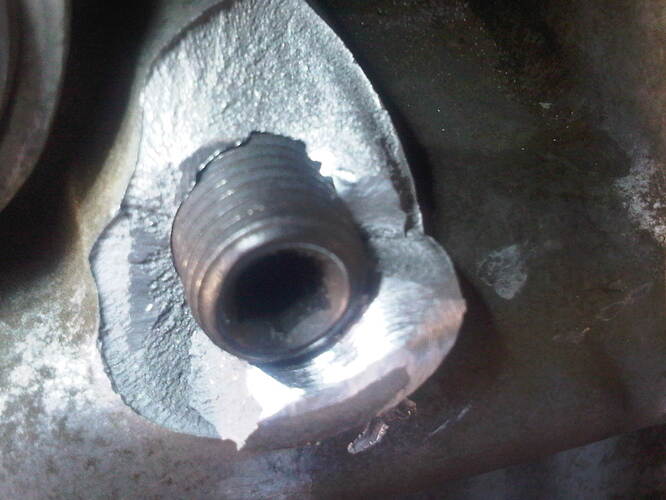
Quick update: Used a dremel and grinding bit to start cleaning-up the damaged area, and the chunk on the bottom-left corner before the crack (in the photo) broke off. Maybe I should’ve listened to mrpenny about using a carbide bit? I don’t whether the chunk was already structurally-compromised and ready to break off, but it kinda spooked me. Stopped grinding for now. Started out drilling the hole to 23/64" (I have a plan for keeping shavings out of the block, but more about that later). I was considering drilling and tapping to 1/2"-20 (hell-no), then maybe M12-1.25 (probably not), but am wondering if these would be too big, so am looking to drill/tap as small as possible. I think the old threads for the sensor and area around there is too compromised to hold the new threads in, so my plan is to tap about 1.5cm of new threads. I probed the hole in the block and it seems to go back about 62mm (then hits the cylinder sleeve?)
[QUOTE=mrpenny;2334338]I’ve welded up one of those before. They are definitely a bitch! The one I attempted to fix had JB weld in already filled in there and we never got it to stop leaking even after a significant amount of weld deposited.
If I were to do another though (I’d charge a pretty good), and there’d be some things I’d do differently. First, would be to cut the threads off, up at that first break. Second, get a propane torch and very carefully heat the nub to pull the oil out of the aluminum to the surface. Next, drill a hole at the start of the crack. This will relieve the stress from the crack. After that grind most of the outside/face of that nub and length of the crack down with a carbide bit. Make sure to use a carbide bit as anything else will not get it clean enough, and the safest way. Then, wipe the nub down inside and out till there is no dirt left on the rag. Let it dry. Finally, before welding, turn the cleaning action most of the way on your welder and run the TIG torch over the surface a couple of times to pull anymore oil out. If there is some that comes up, grind that down with the carbide again to clean metal/wipe. Then you’re ready to lay the welds down!
Repairing something like this is time consuming, but can be done correctly if due diligence is taken. I wouldn’t touch that while it’s mounted inside a chassis either. No room to work at all. Also, the problem with welding cast aluminum blocks/heads/valve covers is that the aluminum is very porous. So when you have hot oil running through the parts, they get impregnated with oil very easily. So that’s why all the steps for cleaning/grinding are necessary. Aluminum does not like to be dirty when welding. Warping of the block won’t be a huge concern either since you have a big aluminum heat sink.
There’s more than one way skin this cat, but that’s my two cents worth[/QUOTE]
Thanks mrpenny for all this advice, sounds like I have gotten some input from one TIG welder already :rockon:
The engine is out of the car, my only concern is - would your average welder work on the block while it’s still bolted-up to the head, etc,… and oil in the pan?
[QUOTE=Colin;2334343]I just did a google search, most of the results were from Honda-tech: http://bfy.tw/694j
Thanks for chiming in mrpenny! That’s some great info.[/QUOTE]
Colin, your URL led me to Pepperwood Ave, LB, CA 
But I did end up finding more info on HT, thank you.
Yes, I thought about JB Weld since I still had the top part of the thread-boss that chipped-off but seems like this damage is beyond a JB-Weld-only fix with the cracks splitting away from the threads. Thanks for the devcon tip… I may use it to lock/seal the threads in the plug if I pull-off route #1. Which devcon have you used - their 10 Minute Epoxy? I’ve also read good things about 3M epoxies.


