Here is a how-to I wrote up a while back on how to convert 9004 to 9007 headlight bulbs, which gives you much better light output in all aspects. Makes night driving 100 times better, and it doens’t blind oncoming traffic.
Headlight conversion (9004 to 9007)
This will provide you with tremendously improved headlight output, resulting in increased visibility and safety
-
Remove existing bulbs. To do this, turn the plastic locking-ring, attached to the headlight assembly, counter-clockwise until it clicks loose. The headlight socket and bulb assembly should pull out easily. Be careful not to bang the bulb on anything in case of breakage. Remove the bulb, being careful not to touch the glass with your hands, as the oils can damage the bulb. You never know when you’ll need to re-use them.
-
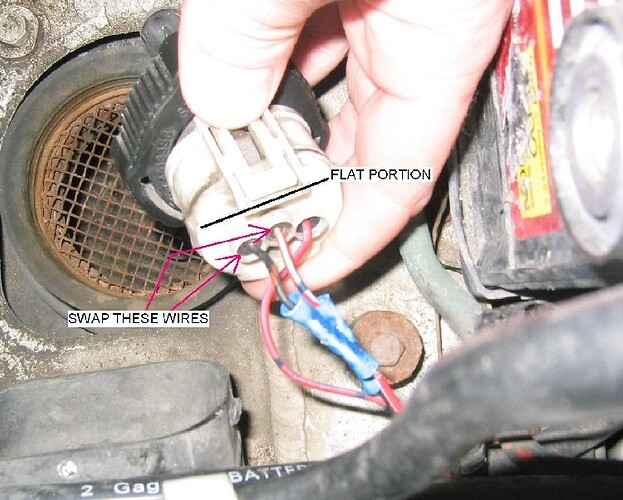
Swap the wires. This step involves looking at the harness from the wire-side (“back”). Hold the harness so the flat portion faces UP, and you are looking at where the wires are going in to the plastic harness. You want to switch the left and middle wires. Leave the wire on the right as-is. It is highly advisable to use a soldering iron and make a GOOD soldering connection to do this, and use heat-shrink tubing to seal it from the elements. However, my soldering iron broke, so I temporarily used crimp-connectors until I get a new soldering iron (Christmas gift, hahaha). Make sure to cut the wires at least 1 ½” away from the harness to leave enough slack to work with, and make sure to put the heat-shrink tubing on the wire before soldering (duh!). See picture #1 to a detailed view of what wires to swap.
-
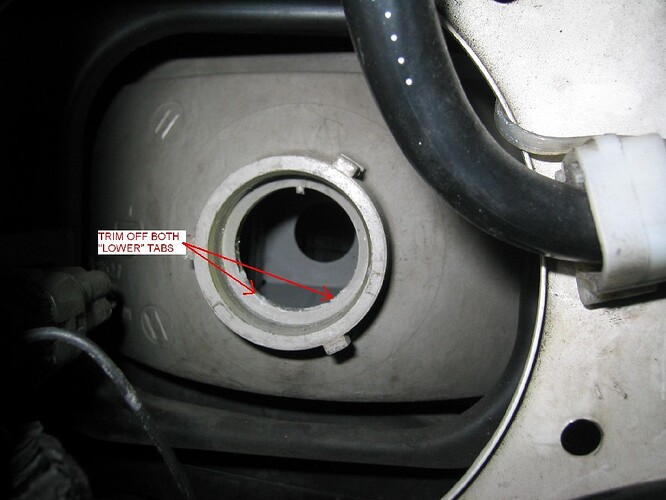
Modify the housing. In order for the 9007-style bulb to fit in the 9004 housing, you must modify the housing using a utility knife or exacto knife to cut two of the three tabs off of the housing. By comparing the grooves on the old 9004 bulb and the new 9007 bulb, you can see which tabs need to be cut off from the housing for the 9007 bulb to fit. Use the knife to scrape the tab away as cleanly as possible. See picture #2 for a detailed view of the removed tabs.
-
Repeat the above steps for the other headlight.
-
Install new bulbs (9007 type) into the harness, being careful to NOT TOUCH THE GLASS WITH YOUR HANDS. Use a couple of Kleenex’s or a shop-towel (the blue things on a roll) to ensure you don’t touch the glass with your fingers.
-
Insert bulb into the headlight housing (reverse of removal), ensuring that it fits properly (that the tab you removed was the proper tab!), and then use the locking-ring to secure the assembly to the headlight housing.
-
Test the new lights!!
-
Make sure to properly aim the headlights, as the 9007 bulbs create a bit more glare than the 9004’s. I had to adjust mine down and to the right (passenger side) a bit more than normal. Use a large Phillips screwdriver through the holes in the radiator support to adjust the beam higher/lower, and left/right. There is more information on this in the Helm’s or on G2IC (Search!).
A general rule of thumb for aiming headlights is to measure 25’ from a white wall, on a flat piece of pavement. Park the car perfectly perpendicular to the wall with the headlights at the 25’ mark. Measure the distance between the two headlights from the centerline, and also measure the height from the ground, of the headlights (center). Mark this on the wall to get an ‘X’ where the headlights are centered. Now mark 2” down and 2-3” right of those marks. Mark that with a bigger ‘X’. This is where you want the “hotspot” of the headlights to aim. Turn on the lowbeams, and use the adjusting screws to get the headlights as close as possible to this second X. You may want to try a bit more to the right (around 3.5”) with the 9007 conversion, as like I mentioned before, there is more glare which can somewhat blind oncoming traffic. Test it out at night and if nobody flashes you, you should be good to go. Hi-beams do NOT need adjusting, as they are aimed at the same time as the low-beams.
This is a very thorough write-up, and in all honesty only takes about 20 – 30 minutes to complete (minus the headlight aiming, which can be done at a later time during the night).
The BEST bulbs to buy with this conversion are, without a doubt, the new Sylvania Silverstars. They are the brightest and whitest lights you can buy and project the most light I’ve ever seen from a non-HID system. Look up reviews all over the place – the general consensus is that they are among the best of the best. Just make sure to buy 9007 bulbs, and not the crappy 9004 bulbs that your car USED to take. ![]()
Enjoy.
© 2003, Eric Pruys. Curls.00@rogers.com. AKA “curls” on G2IC.com
Disclaimer: I assume no responsibility for damages caused by this modification, as individual talents and cars are different. But seriously, it’s simple and worth it.

