Interesting…
I would love to hear what some of the tech geeks at ES would have to say about the condition of your old bushings. Do you still have them? Sending some pics to them for feedback might get an interesting response. Just a thought.
Interesting…
I would love to hear what some of the tech geeks at ES would have to say about the condition of your old bushings. Do you still have them? Sending some pics to them for feedback might get an interesting response. Just a thought.
I threw all those bushings away. I figured that ES’s major business is the domestic lineup and having feedback from import owners would be simply dust on their shoulder.
I still prefer to use their stuff. The OEM rubber, even the rebagged OEM stuff AKA mugen hard rubber bushings, don’t seem to do the job the ES kit does.
-Joe
Were in Texas are u at. I would love to see your car in person. Maybe even get some pointers for mine.
Thank you so much for this post.
archivethis
93GS-R : I live in Mansfield. You’re welcome to meet me somewhere. I work in Grapevine @ the lexus dealer as a tech. I also need to get Adam with his GS-R/ITR together for a GTG one of these days after work. Call my cell (817) 946-1067
-Joe
Not to jack the thread, but any of you guys wanting to meet up: http://www.g2ic.com/forums/showthread.php?t=148488
Next meet is 7-15-06
I’ll be there.
-Joe
That meet sounds good. I just hope i can get my teg running by then.
Even if you cant get it running by then, come anyways.
im wondering about the notching of the bushings, did you just take a die grinder and a cutting wheel and make a notch 360 degrees around the middle of the bushing?
also where did you source all of your fittings from?
The grease fitting has a hole aligned with the hole I made in the urethane bushing. The grease makes its way to the rotating sleeve and eventually finds its way all the way around the sleeve to lubricate it. This process of having the grease find its way all the way around takes about a mile or so down the road.
-Joe
carchitect
Those Zerk fittings you placed on your teg, is that something I could do with regular hand tools and a drill. I have crescent tools and they always beack on me. What tools would you recommend for the job you did, if you don’t mind me asking. I like to do something like this in the future and feel many too.![]()
I wish I could attend that meet, I don’t think my 78 Ford Pinto would make it in Texas heat…![]() the teg stays home
the teg stays home
Tanks for reading…
I purchased the Zerks at a local auto parts store. Auto zone to be exact to you shouldn’t have any trouble finding them. If you do search on line.
For the drilling I used cobalt drill bits which can be sourced down anywhere. For the taps and dies I used Snapon. Most of all the tools I own are Snapon. Including my 3 bay toolbox and side cabnet.
-Joe
Thank you,:salute:
In any pivoting joint with polyU bushings (such as an LCA) does the anchoring bolt pivot within the sleeve or does the sleeve pivot within the bushing? If it’s the former, then shouldn’t a hole (or holes) be made in the sleeve as well so that the grease can get to the bolt? If it’s the latter, then I understand why you should only drill a hole in the bushing so that the grease can seep into the space between bushing and the sleeve. The reason I ask is that if you look at a stock LCA with the rubber bushings, the sleeve pretty much is fused to the rubber material. Do movements at the joint take place in the bolt moving within the sleeve or as the pliant rubber material twists around the sleeve?
In OEM applications the rubber twists and eventually deforms or tears. On urethane applications the sleeve pivots in the urethane. The grease is there to prevent binding. With OEM applicaitons the bushing bind can cause the suspension to respond slower and the twist can be somewhat difficult to setup the height of the vehicle initially. For this reason its advisable for OEM type bushings to tighten all bolts while the suspension is loaded with the car rested on level ground. An alignment lift is best suited for this purpose. Urethane applicaitons the sleeve basically transforms the suspension pivots to bearings.
-Joe
Very nice writeup!!!
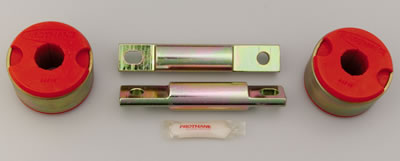
And for the rear tow arm bushings (compensator arms), why not use the kit prothane already makes for it, 8.309 ?
Also, please expain the notching of the bushings in detail if you would
The prothane TA bushings are rather hard and I was unsure are how the change in camber is going going to affect binding that most people were mentioning about urethane TA bushings. For that reason, I picked the ES TA bushings over the Prothane since the bushings are softer. I also prefer the ES master suspension kit since it has worked for me in the past. I’ve driven hondas with the prothane kit and they were considerably stiffer than the ES kit. Although a few of my ES bushings in the past kit were torn I predict that they won’t happen with the zerks I’ve installed this time.
One advantage with the Prothane TA bushings is that they come with the shells and shafts so the install would be quicker. But you will need a press to press out the old shells and install the new shells.
A little advice for anyone who is going to install the zerks.
MAKE SURE THAT YOUR TAP ISN"T BINDING.
Take your time tapping the holes. Use plenty of light oil to assist in tapping the hole. The last thing you want is for that tap to break in the hole. Taps are very hard carbide steel. For this reason they are extremely brittle and can’t be drilled and extracted if broken. Notching the bushings is done on any two piece bushings. Its fairly straight forward. You can even do it with the drill bit you used to drill the hole initially.
I have the prothane TA bushings along with the ES master kit. I can’t wait to see how the car handles ones I put everything back together this month. But I didn’t do the zirk fittings. I already had everything removed, powder coated, and the new bushings put in before you posted this. I’ll just be sure to re-lube them every year or so.