Since I’ve had my car I’ve had no air at all. So today I went in there and was going to take the blower motor out and see if it was rusted out or whatever, you know, I have the cowl leak just like everybody else. Well I saw that there were two wires hanging down from the motor itself - number 6 in the picture - and they were cut. The previous owner was stupid as hell so I can’t even begin to imagine WHY they would cut them, but now I’m wondering if someone can tell me where I’m supposed to connect them. One is blue and the other is black. I figure this MIGHT be why it’s not working…
Umm yes I know this. They are connected to it, and are hanging down from it, a couple inches from it. I need to know where they are supposed to go FROM the motor.
Check in behind the lower plastic kick panel on the side. There should be a connector of some sort. Do not mistake them for the service connectors and what not though. If I remember, there wasn’t a whole lot of slack and if not connected could possibly fall in behind the panel. I remember when I replaced my blower motor, the new unit did not have a connector on it. I had to cut the connector off the old motor wire it to the new motor and then plug it in. Let me know if you still can’t get it figured out and I’ll see if I can snap a picture for you.
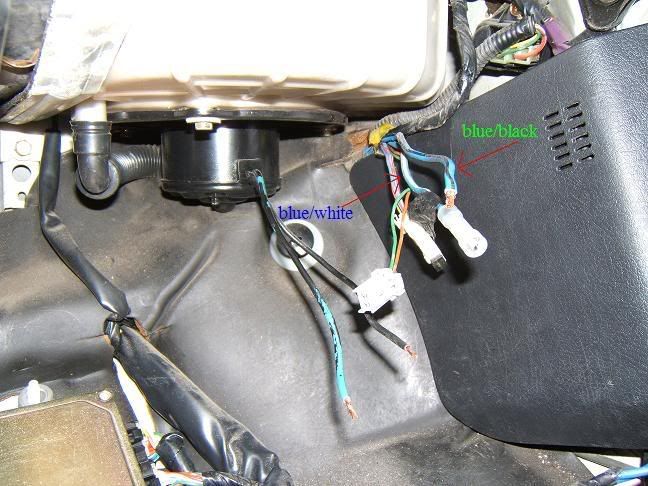
Sorry, I can’t bring up the images you posted, all I see is the white box with the red X, however, the 2 leads going to the blower motor are blue/white, [12V+, hot in run] and blue/black, [from “Heater Fan Switch” and “Blower Resistor Unit”] a two pin plug is plugged into the blower motor housing, easily accessible from below, [pass. side].
The only blue lead in the circuit is from the “HFS” to the “BRU”, [speed one], the “Blower Resistor Unit” is on the front of the blower box, [behind glove box] the plug has 4 leads, blue, blue/white, blue/yellow and blue/black, speeds 1, 2, 3, and 4.:hmm: 94
Yeah see if you can get me a pic of where your wires go, cause I looked in the seatbelt motor area and there are some connectors, like for checking codes and such (I have a 93) but I couldn’t find any wires that looked the same as the ones that were cut…
here you go…you owe me one :
I’m not sure how it was connected before, but now that I look at it, I apparently did a shitty job rewiring it as it came apart on me when I pulled it out to get the picture. I think I actually cut the connector off and used quick connect connectors on it.
It might be a bit hard to see, so if you need the original size image for clarity, I can email it to you. LMK.
blue/black is negative I think and the blue/white is positive.
[QUOTE=BacardiBreezer;1731571]Ok so I finally got a picture of my mess, not sure what the hell to do though. I can’t find the black one…:mad:
[/QUOTE]
Black? Take the black wire that you’re holding in the first picture and wire it to the blue/black wire and wire the blue to the blue/white. The blue/black and blue/white wires I’m referring to are the ones that appear to be cut. If that doesn’t work try reversing them.
Do you have a multimeter or test light, or can you borrow one?
The blue/white lead, the one without the blue butt connector on it] should be “hot”, [12V+] when you turn on the ign. switch to run, you need to check if it does.
The blue/black lead, the one with the blue butt connector, is the ground, it should read no ground when blower switch is off and better and better grounds as you turn the blower motor speed control up, when the speed control is at 4 you should have a full ground, you must also check that.
The 2 leads, blue/white and blue/black connect to the blower motors 2 leads, [looks like a blue and a black lead, hard to tell with that pix].
You can test the blower motor by supplying 12V+ to one of the leads and a ground to the other lead, it is a DC motor, so if it is working it will make no diff. how you connect the 12V+ and ground, [what wires on the motor you connect them to] if the motor is good it will run, the “polarity”, [which way you connect the 12V+ and ground] will determine in which direction the motor runs, clockwise or counter clockwise, the correct polarity is when air blows out of the vents, the wire you connect the 12V+ to so the air blows out of the vents is the one the blue/white wire is connected to the blue/black is connected to the other one, [no matter what the color of the wires on the blower motor are. 94
I don’t have access to a multimeter…and I have the cowl leak that alot of people have, my pass. side carpet is all wet, we just got flooding rains in the past few days and I can tell it’s been leaking a long time, alot of rusty stuff up in that area.
OIC, I was going to ask about the rusty bolts holding the blower motor in place,
The way the motor mounts is a problem if there is a leak, as the motor is the low point.
If you do not have a meter or test light, you can still test the motor by supplying it with a known 12V+ and ground,
you could use jumper cables, connect to motor leads then to batt., if motor works at least you know it’s not the motor, and the problem is power or ground supply to the blower motor, to check that you will need a multimeter.
You can get a multimeter from Radio Shack for $20
The “cowl leak” is probably at the fresh air intake, the sealing gasket has dried up/deteriorated, not sure how much of a cow it is to repair on a G2, blower housing has to be removed from the car. I don’t think it’s a dash pull, but it will definitely mean pulling the console, ashtray, radio, climat control head and all lower dash trim and glove box, you would also have to disconnect the heater hose lines.:uhoh: 94