OK, I just finished doing this 3 hours ago. It’s very easy & takes no time flat.
NOTE: I used a wheel w/ a single push button. You can use a double button though. Just tinker w/ the power wire. (more on power wire later)
This guides assumes you have a little knowledge of how to remove the wheel & a Haynes manual to guide you through the removal.
Parts/Tools needed:
1…An aftermarket steering wheel (I used a Grant, but any kind will do.)
2…The appropriate hub/ horn adapter for your wheel & Teg. Should have 1 (one) wire on the adaptor.
3…One wire tap/tee. ( I got a set that has a female spade connector on it.)
4… about 5" of 14 guage wire & electrical tape.
5… Crimper/cutter/stripper tool.
6… one female spade connector (yes other than the wire tap one)
7… A 1/4" brass strip 2 1/2" long (I pulled this out of an electrical cord. Use a cord where the prong is folded in 2, so you can bend it to make it longer. Use a prong w/ a hole it it to put screw through.You can also get a strip at a hardware store too.)
8… a small 1/2" long screw & a small washer. (Screwdriver too. DUH!!!)
9… your factory sized lug nut wrench.
HERE GOES!!!:
Step 1…Remove your factory wheel by locking your steering lock & turning the main nut on the shaft w/ the lug nut wrench.Remove the spinning ring w/ the plug in it (you’ll see) &throw them away. Remove the TOP cover (pop off the trim ring, pull cover apart, & drop the wheel to it’s lowest setting.
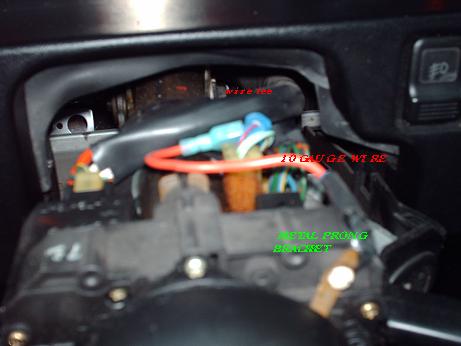
Step 2… You’ll notice on the top of your parts inside the cover area is a plug with only 3 wires it it. the colors are:
pale green w/ black stripe
pale green w/ yellow stripe
blue w/ red stripe
You want the blue/red one. Take ur crimper & use the 16 gauge stripper to make a CUT in the wire SHEATHING (DO NOT cut the wire in half, just make it so some copper is exposed. Maybe a 16 of an inch. If you can’t get the crimper in there, CAREFULLY use a lighter to burn away some sheathing. If you heat it a bit, you can pull a little away, thus exposing wire.
Attach the wire tee on this exposed area & close it. Crimp the supplied spade connector to the 5’’ wire I told you to get, (don’t forget to strip the ends!!) &
attach it to your wire tee. Attach the other female spade connector to the opposite end of your 5" wire.
Step 3… There is an open hole on the plastic housing of the steering shaft. It’s on the top right, & you can see through it. Put your screw & washer through the hole in your brass strip (either you make it or it’s on there from your electrical cord plug piece, depending on which one you got.) & screw this into that open hole. Leave an inch above that hole on your strip then bend it over the top of your plastic housing.
Attach the other spade connector to the strip & tape it up. Bend the strip so that it touches the copper ring on your hub adaptor. This completes your hardwire to the horn. now it’ll sound off when you finish hooking up your horn button!!
Step 4… Assemble the hub adaptor following the supplied instructions & attach the wire leading from it to the male spade end on the horn button. (some have 2, you only need the power one). To test your horn for proper function, put the adaptor on the shaft w/ the copper ring touching the brass strip. Then attach the wire on the hub adaptor, & touch the components together as if the wheel was attached. If the horn sounds when you push it, IT WORKS!! Screw the main nut onto the shaft, & hook it all together. ENJOY!!
The problem I had was that I didn’t realise that the hub adaptor assembly IS the ground! That means when you hook up all components the button completes the connection as it is pushed. Why? the ring that the button sits in (behind the face of the wheel) is connected to the neg. on the button.
Why does this work?
The spinning ring doesn’t fit behind the new wheel, & that ring makes your connection AND allows the horn to function. By wiring a strip like this you “bridge the gap” so to speak.
What about my cruise control?
You can do this to the pale wires too. Those are the “set” & “resume” functions for the cruise buttons. If you use a thicker wire instead of 14 gauge
(like 10 gauge) you can hook a wire tee to those lines & connect the fatter wire to your strip. I know you can pull the buttons off your stock wheel & make a bracket to attach it to new wheel. (seen the “NOS” button attachments some wheels have? Try that too.)
PICS ARE COMING SAT. OR SUN. I PROMISE!!! Hope this helps everyone.
:burnout: :manual:


