Does anyone have detail pictures of this procedure?
Man, way to resurrect this thread from the dead.
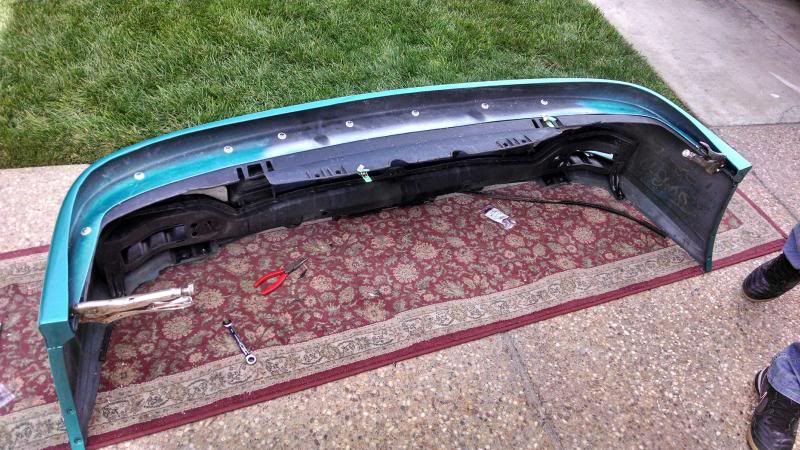
As you should be aware, the JDP lips do not come pre-drilled. There are many ways you can go about doing it, but I, like others (if you read the previous comments from years back), chose to utilize the OEM lip mounting points. There are 11 nut clips that are attached to the underside of the bumper and 11 bolts that screw into them. The following process isn’t the easiest of jobs, but it ensures an OEM fit and you won’t have to worry about it falling off or flexing in odd spots if you bump into something (as if you were to use self-tapping screws).
1.) Remove your front bumper and flip it over so that you can see the underside.
2.) Grab some clamps and after putting the lip onto the underside of the bumper, clamp them together. It’s important that you line them up as good as you can before marking where you are going to drill the holes.
3.) Flip the bumper right side up again and begin to mark the future ‘drill points’. If you have the nut clips installed, use a paint pen, sharpie or scratch awl to visibly mark the center of the clip. I used a scratch awl (a screwdriver look-alike with a long, pointed end used to mark holes or punch through objects).
4.) Make sure you mark all 11 mounting points. Getting the five mounting points underneath the grille portion is a task in itself, so find whatever method works best for you.
5.) After marking the lip, flip the bumper over again, undo the clamps and remove the lip.
6.) Now it comes time to drill the holes. Using smaller drill bits and working up to bigger ones, drill the holes out until your OEM lip hardware will fit through them.
7.) Test fit it to the bumper and screw in the bolts (hand tight) to ensure that you have a good fit and that the bolts will go through the lip all the way. Trim what you need to ensure for a tighter fit.
8.) Install the lip and re-install your front bumper.
I didn’t take many detailed pictures of when I prepped mine (as I was more focused on doing the marking and drilling right) but I’ll share what I did take.
I have a carbon fiber JDP “OEM Style” front lip, but regardless of the lip everything should still apply (90-91 vs. 92-93 and carbon fiber vs. fiberglass).


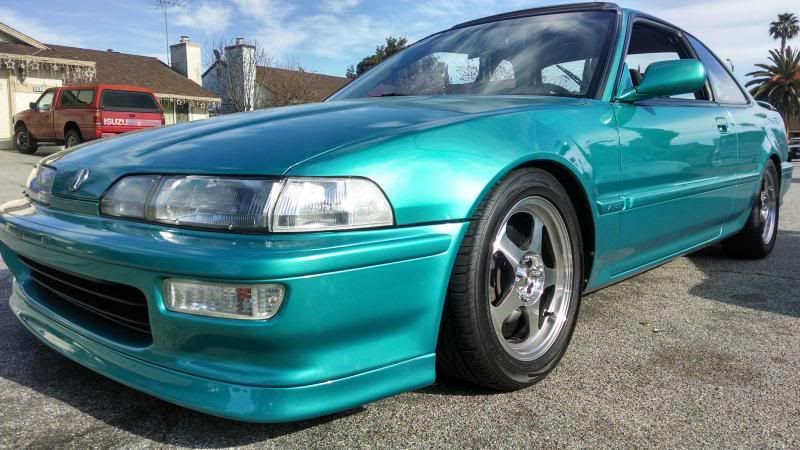
And, the finished product…

[QUOTE=OldskoojdmDA9;2310626]Man, way to resurrect this thread from the dead.
As you should be aware, the JDP lips do not come pre-drilled. There are many ways you can go about doing it, but I, like others (if you read the previous comments from years back), chose to utilize the OEM lip mounting points. There are 11 nut clips that are attached to the underside of the bumper and 11 bolts that screw into them. The following process isn’t the easiest of jobs, but it ensures an OEM fit and you won’t have to worry about it falling off or flexing in odd spots if you bump into something (as if you were to use self-tapping screws).
1.) Remove your front bumper and flip it over so that you can see the underside.
2.) Grab some clamps and after putting the lip onto the underside of the bumper, clamp them together. It’s important that you line them up as good as you can before marking where you are going to drill the holes.
3.) Flip the bumper right side up again and begin to mark the future ‘drill points’. If you have the nut clips installed, use a paint pen, sharpie or scratch awl to visibly mark the center of the clip. I used a scratch awl (a screwdriver look-alike with a long, pointed end used to mark holes or punch through objects).
4.) Make sure you mark all 11 mounting points. Getting the five mounting points underneath the grille portion is a task in itself, so find whatever method works best for you.
5.) After marking the lip, flip the bumper over again, undo the clamps and remove the lip.
6.) Now it comes time to drill the holes. Using smaller drill bits and working up to bigger ones, drill the holes out until your OEM lip hardware will fit through them.
7.) Test fit it to the bumper and screw in the bolts (hand tight) to ensure that you have a good fit and that the bolts will go through the lip all the way. Trim what you need to ensure for a tighter fit.
8.) Install the lip and re-install your front bumper.
I didn’t take many detailed pictures of when I prepped mine (as I was more focused on doing the marking and drilling right) but I’ll share what I did take.
I have a carbon fiber JDP “OEM Style” front lip, but regardless of the lip everything should still apply (90-91 vs. 92-93 and carbon fiber vs. fiberglass).


And, the finished product…
 [/QUOTE]
Hey, love ur car. Do you have any more pics? or a build thread link? Thanks.
Thanks for the comment man, but I do not have a build thread. Here’s a picture I took of my car near the beginning of January though that I’ll share. (The pictures I posted above are from over a year and a half ago.)

[QUOTE=OldskoojdmDA9;2310626]Man, way to resurrect this thread from the dead.
As you should be aware, the JDP lips do not come pre-drilled. There are many ways you can go about doing it, but I, like others (if you read the previous comments from years back), chose to utilize the OEM lip mounting points. There are 11 nut clips that are attached to the underside of the bumper and 11 bolts that screw into them. The following process isn’t the easiest of jobs, but it ensures an OEM fit and you won’t have to worry about it falling off or flexing in odd spots if you bump into something (as if you were to use self-tapping screws).
1.) Remove your front bumper and flip it over so that you can see the underside.
2.) Grab some clamps and after putting the lip onto the underside of the bumper, clamp them together. It’s important that you line them up as good as you can before marking where you are going to drill the holes.
3.) Flip the bumper right side up again and begin to mark the future ‘drill points’. If you have the nut clips installed, use a paint pen, sharpie or scratch awl to visibly mark the center of the clip. I used a scratch awl (a screwdriver look-alike with a long, pointed end used to mark holes or punch through objects).
4.) Make sure you mark all 11 mounting points. Getting the five mounting points underneath the grille portion is a task in itself, so find whatever method works best for you.
5.) After marking the lip, flip the bumper over again, undo the clamps and remove the lip.
6.) Now it comes time to drill the holes. Using smaller drill bits and working up to bigger ones, drill the holes out until your OEM lip hardware will fit through them.
7.) Test fit it to the bumper and screw in the bolts (hand tight) to ensure that you have a good fit and that the bolts will go through the lip all the way. Trim what you need to ensure for a tighter fit.
8.) Install the lip and re-install your front bumper.
I didn’t take many detailed pictures of when I prepped mine (as I was more focused on doing the marking and drilling right) but I’ll share what I did take.
I have a carbon fiber JDP “OEM Style” front lip, but regardless of the lip everything should still apply (90-91 vs. 92-93 and carbon fiber vs. fiberglass).


And, the finished product…
 [/QUOTE]
Hey thanks man… that’S exactly what i ended up doing. Not a lot of pictures out there when i was researching. The only difference i did was that i didn’t end up using the factory holes. Still came out great though. ![]()
Glad you found a nice and secure way of mounting it. I’ll agree that there isn’t much information out there on the install, but with any logical sense you figure it out. Utilizing the OEM holes makes mounting/removing easier but your method seems just as effective. The final product looks great.
[QUOTE=OldskoojdmDA9;2310667]Thanks for the comment man, but I do not have a build thread. Here’s a picture I took of my car near the beginning of January though that I’ll share. (The pictures I posted above are from over a year and a half ago.)
 [/QUOTE]
Make a build thread! Lol
You know I won’t Carlos. I’m long past that… If my build were something I wanted to share publicly I would have started one five years ago.


