Ok, so I’ve had the rear sedan handles lying around for years, & today I said, “Fugg it! Imma put them thangs on!”
I tried the write up in TEG TIPS, but it didn’t work for me!! Don’t know if it’s because those were 90-91 handles onto a 90-91. but i’m using 90-91 rear handles on my 93 DA9.
Anyways, this method seems to be the best one. Another person did a similar write up, but the pics are lost, so my turn! The main thing is that in the Teg Tip, it says to drill a hole in the metal lever & attach the rod there. No bueno on mine. Couldn’t get the angle of the rod correct, & it would bind the latch. When this happens & you lock it, the levers get stuck & won’t allow the inside OR outside handles to work!! I tested all this with the door panels off of course. This all lead me to realize that the length of travel isn’t sufficient off the metal lever. What follows is the easiest way to do the mod, & I only found out after a bunch of screwing up. So you guys benefit from my mistakes!!! YAY!!
WARNING!!! -------------------------WARNING!!!------------------
This is an intermediate level mod! It is NOT easy to do. Not super hard, but bear in mind that you will be removing (in order)
the interior door panels, the mirrors, the outer window sashes, the lock latches, & finally the old handles. Of course you will need to have power locks already, or install the aftermarket ones.
THEN you can start the swap!! It requires drilling the new handles, adjusting the handle rods, & tweaking the seating of everything a bit. I’m assuming you have done all these before or know how to do them, or how to find the info in the manuals & forums. DO THIS AT YOUR OWN RISK!! You may not be able to use your old handles after you get started!!! We will begin with all the stuff listed above removed, so as to save space & time here. Good luck & happy wrenching!!
TOOLS NEEDED:
10mm & 12mm sockets, (2) 3" extentsions, & a ratchet. (3/8 drive preferred)
#2 head & #3 head phillips screwdrivers
needlenose pliers
(2) pair flat pliers
(2) bread twisty ties. (YES! For reals! You’ll see)
A drill
A 7/32 & a 5/16 drill bit
PATIENCE!!
KEYLESS HANDLE PREP:
You need to mimic the function of the old front locking handles. The 4dr rear handles open with the metal lever pulling the rod UPWARD. Your front handles go DOWNWARD, & so the rear handles must be modded as such. !!!THE DRIVER SIDE KEYLESS GOES ON YOUR CAR’S PASSENGER SIDE, & VICE VERSA!!! Back to modding:
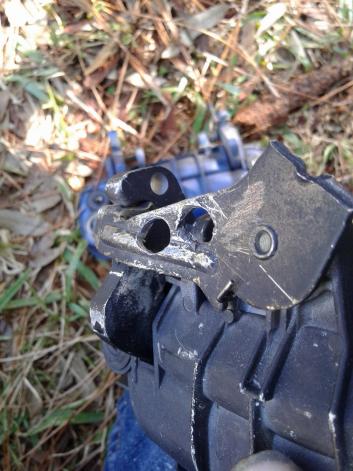
First off, ditch the metal lever altogether. Drill it’s rivet out with the 7/32 bit, & it’s spring & bolt will pop off too. Then CAREFULLY use the 5/16 drill bit to make a hole in the little “claw” on the keyless handles. Afterwards, run the 7/32 drill bit through it to make it a tad bigger. Better to start off small on this hole. You screw it up, & you can throw those handles away!! Here’s the old handle, & the cleaned up new keyless handle after to show you the mimicry…
[ATTACH=JSON]{“alt”:“Click image for larger version Name: 20171126_120708.jpg Views: 1 Size: 38.1 KB ID: 1116267”,“data-align”:“none”,“data-attachmentid”:“1116267”,“data-size”:“small”}[/ATTACH][ATTACH=JSON]{“alt”:“Click image for larger version Name: 20171126_121719.jpg Views: 1 Size: 26.7 KB ID: 1116268”,“data-align”:“none”,“data-attachmentid”:“1116268”,“data-size”:“small”}[/ATTACH]
So the handles are ready!! Now, for the tear down!! Like I said, I’m starting at the lock latch. The door panel & window glass & etc. have been removed. All the door panel is exposed, & all areas we need to get to are accessible. Of course get rid of that plastic!! Tape around the handle area so you don’t scratch your paint!!
TEAR DOWN:
-
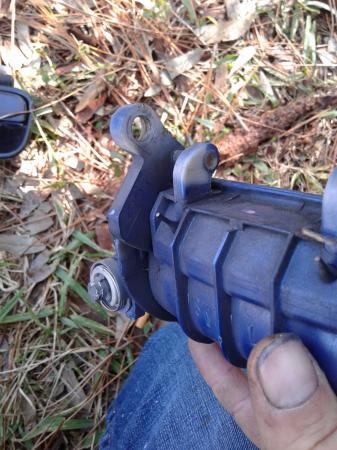
First, remove the inside handle/lock assembly by taking out the 3 screws on it with the #2 phillips head screwdriver, then pop off the rod clips.
[ATTACH=JSON]{“alt”:“Click image for larger version Name: 20171126_121035.jpg Views: 1 Size: 30.4 KB ID: 1116269”,“data-align”:“none”,“data-attachmentid”:“1116269”,“data-size”:“small”}[/ATTACH] -
Then, remove the clips from the lock rod pivot, & the clip under it that holds the inside handle rod:
[ATTACH=JSON]{“alt”:“Click image for larger version Name: 20171126_120803.jpg Views: 1 Size: 22.9 KB ID: 1116270”,“data-align”:“none”,“data-attachmentid”:“1116270”,“data-size”:“small”}[/ATTACH] -
After that, unplug the electrical connector from your latch, & unclip its tabs from the door body.
-
Now, unscrew the 2 bolts that hold your handle in place.
-
Then, unscrew the lock latch from the door by it’s 3 screws using the #3 phillips head screwdriver.
-
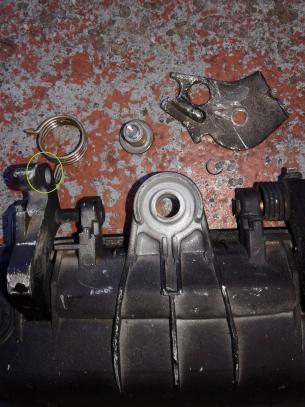
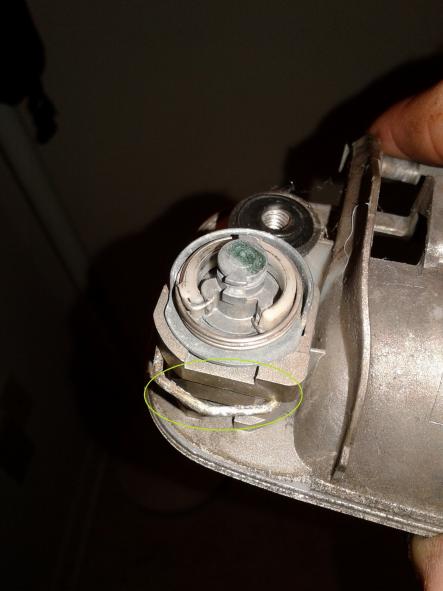
You’ll now be able to pull the handle from it’s hole a bit, but you gotta remove a metal clip from behind the lock itself using your needlenose pliers. Here’s a pic of it slighty exposed:
[ATTACH=JSON]{“alt”:“Click image for larger version Name: 20171126_204740.jpg Views: 1 Size: 26.6 KB ID: 1116271”,“data-align”:“none”,“data-attachmentid”:“1116271”,“data-size”:“small”}[/ATTACH] -
After that clip comes off. you can push the lock cylinder out of the old handle. It remains attached to the latch for now.
-
Then, wiggle/twist carefully to get the handle to come out of it’s hole. The handle rod WILL be attached still.
-
Unscrew the handle on the nub attached to the handle rod until the handle comes off, leaving the rod protruding from the door.
-
Put that nub in a safe place. DON’T LOSE IT!!
-
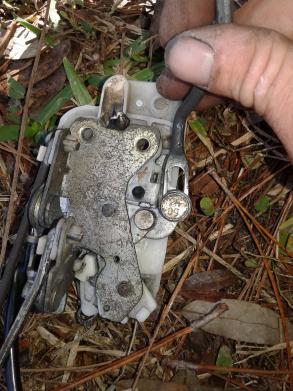
Pull the whole lock latch assembly out.
-
Now for that lock cylinder… I just broke it’s plastic that holds it’s rod near the latch & chucked it.
That was the hard part!! Now you have an empty hole in your door, & no lock latch installed.
THE REINSTALL. Now you can put the keyless handle in!!
- Bolt it up with the 10mm bolts, & then turn your attention to the handle rod. It’s a “dog leg” meaning if you’re starting with the driver’s side handle rod, it goes (starting from the lock latch) up, then right, then up. bend it so you have a bit more rod at the top.
How???
-
Grab the first “up” part of the handle rod with one set of your flat pliers, put the other set on the “right turn” section, & pry it up & to the left just a bit. Then, grab at the far right of the “right turn” section with your pliers, & pull upward & to the right a bit. NOT A LOT!! You only need to “add” about a half inch.
-
Reinstall the lock latch.
-
Reattach the lock & inner handle rods into their clips at the pivot.
-
Reinstall the inner handle/lock assembly.
-
Plug the electrical connector in, & attach its tabs into the door body.
!!!THE TRICKY PART!!! --------------- KEEP THE DOOR OPEN DURING TESTING & ADJUSTING!!
Now, screw that all important “nub” onto the rod, & start judging where it sits close to level with the mimic hole you made in the keyless handle. You have to push the handle rod up & down, & also pull the inner handle to see where they sit. PULL THE INNER HANDLE FIRST, THEN PUSH THE OUTER HANDLE ROD DOWN FOR EASIEST ADJUSTMENT. If they have total travel up & down freely, & the nub seems right, put the nub into the mimic hole you made, & try it again. If it works still, move on to the next step. If not, adjust the nub height. THEY MUST MOVE FREELY, & NOT BIND!!
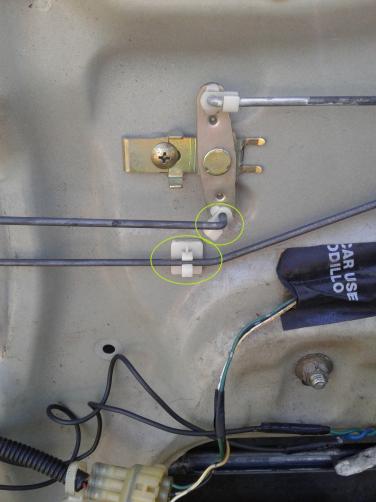
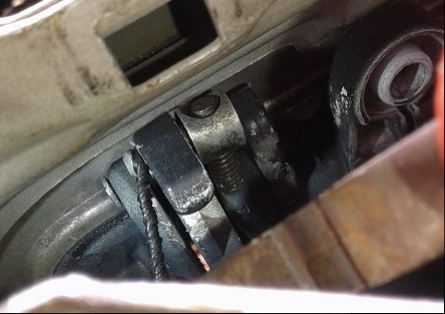
Look at the pic below. This is the driver’s side lock latch, sitting as it would in your door if you were looking at it through the openings in the door body. See how the rod has room to move up & down? That groove? That’s the rod travel. It will travel down the groove, then continue further to push a lever down. See the smaller gold circle to the left of the handle rod? That’s the lever. That lever is what opens the latch, & therefore, your door. It is also attached to the inner handle rod, so it all works in conjunction to each other. The rod travel is what makes or breaks this mod. It needs to happen freely while the lock latch is in the door too!!
[ATTACH=JSON]{“alt”:“Click image for larger version Name: 20171126_122837.jpg Views: 1 Size: 30.4 KB ID: 1116272”,“data-align”:“none”,“data-attachmentid”:“1116272”,“data-size”:“small”}[/ATTACH]
NOW WE TEST:
- Keep your door open, & use a screwdriver to engage the lock latch.
- Try your outer handle. If it works, reengage the lock latch, & try your inner handle.
- If that also works, engage the lock latch, & pull the locking rod. You shouldn’t be able to “open” your door with either the inside or outside handle.
- Pull the lock rod the other way. NOW you should be able to “open” your door.
- If ANY of those fail, readjust the nub.
- If that still doesn’t work, pull the whole lock latch assembly again & readjust your handle rod height again!! (I had to on the passenger side.)
- If/when all that works…
THE BIG TEST:
-
Shut your door.
-
Open & close it with the outside handle, then the inside handle.
-
If BOTH work, then move on. If not, take the nub out & readjust til they do.
-
Now, turn the key, & let your auto locks engage. Test the inside & outside handles. They locked? Good. Now turn the car off & let the locks disengage.
-
Open the outside. It work?
-
Close it, & try the inside. It work?
-
Try the test cycle a couple more times, just to be sure.
-
Congrats, THEY WORK!!! YAY!!! Now you can finish up the install.
FINISH HIM!!!
- Grab a twisty bread tie, & make a loop in the middle.
- Loop it around the little part of the nub.
- Use your needlenose to grab both ends together, & then twist until the tie is tight around the nub protrusion. You don’t have a clip that will keep the nub/rod combo in place, so this is how I did it.
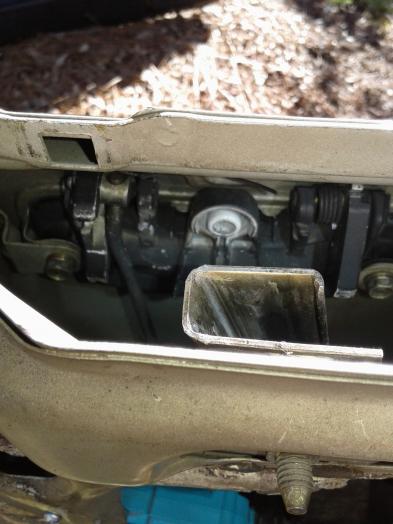
- Tuck the remaining tie up out of the way. Here’s a pic of that. It’s sucky, but yeah:
[ATTACH=JSON]{“alt”:“Click image for larger version Name: 20171126_124541.jpg Views: 1 Size: 95.9 KB ID: 1116273”,“data-align”:“none”,“data-attachmentid”:“1116273”,“data-size”:“small”}[/ATTACH]
So guess what?! It’s done!!! They’re in, & it looks kinda like this:
[ATTACH=JSON]{“alt”:“Click image for larger version Name: 20171126_125828.jpg Views: 1 Size: 31.8 KB ID: 1116274”,“data-align”:“none”,“data-attachmentid”:“1116274”,“data-size”:“small”}[/ATTACH][ATTACH=JSON]{“alt”:“Click image for larger version Name: 20171126_220616.jpg Views: 1 Size: 29.9 KB ID: 1116275”,“data-align”:“none”,“data-attachmentid”:“1116275”,“data-size”:“small”}[/ATTACH]
Now button up the rest of the door, & do the other side. Voila!!!
Hope this has helped everyone, & I’ll be checking back to answer any questions. The attached image is the driver’s side handle with the metal part attached; to show the mimic hole a bit better, & to show that I indeed went through some shit to figure this one out!! Take care folks!!
Write up & pics by Ryan Diener @ Rat Trap Performance