hey i got GSR “fat 5’s” and im painting them black and im leaving the chrome ring around them, they came out decent however the paint easily chips. i read some writeups about how to paint them and i followed the steps and i dont understand why there chipping like that. i used gloss black engine paint- i cleaned the rim, used bondo spot puddy to fill in the curb marks,primered it several times, then sprayed it about 5X with the black and its still chipping. wtf is going on lol???
could it be because u have to let the paint sit for a while, i dont think so though. can i have some advice.
did you sand the rim down a little bit before you primered?
make sure u rough the surface up before u paint so it has somehthing to grab onto. and did u clear coat it at all? i painted my gsr wheels and the only problem i have with chipping is the dumb tire shop kept missing the holes where the lug nutz go and took some nice chips out but other than that i have no problem with chips or scratches in the paint. make sure u let the paint dry atleast 3 hours before u try and put them back on the car and dont drive much or at all for 24hours after that
i really think its the paint i used, im gonna go with either paint for the wheels or regular black spray paint, i think the engine paint i used has a problem sticking to the primer. im gonna give that a shot.
try dupli color wheel paint.
How would you go about this? ROugh sandpaper I want to paint my rims too, so any info would help
get some rough sand paper and scuff up the surface ur gonna paint then clean the areas to b painted. tape off the tire and or lip if u want to have a silver lip. newspaper works well to cover the tire and if ur very careful u can reuse the same cover over on all of the tires. use about 3 thin coats and let them dry atleast 10 min between every coat. then use a clear coat and use 2 thin layers and then 1 thick coat but be VERY careful not to use to much and cause the paint to drip. let it dry in the sun for atleast 3 hours and if u want u can put them on the car again but i wouldnt recommend driving much for the next 24 hours.
i did this exact process with dupli color wheel paint and it worked great and as i said before it wont chip inless something hits it. be vary careful when putting the tires back on if u touch the paint alot it will mess up the finish and most likly chip
I’m in the process of doing this to my winter alloys… should have them done by the end of the weekend if I can find a warm enough place to work.
heres a good write up.
http://www.sennmedia.com/lyle/tegtips/rim_repair/
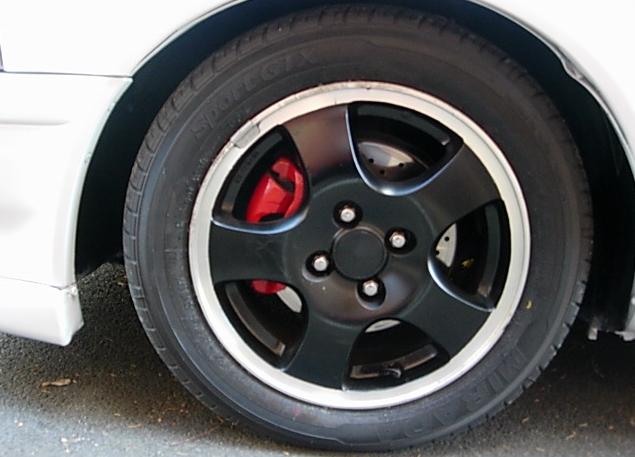
well im gonna post pics of my final product this week, but i left the chrome lip and it came out hot. i used some of my own techniques along with the ones from that write up. this is what i did hopefully it will help. you can use my tips as a guide as well as the other one ^^
first of all i took the rims off the car and cleaned them with rubbing alchohol. the writeup says degreaser but i feel that the rubbing alchohol does just as good and its a shit load cheeper.
second once i got off all the dirt, i took a boxcutter and measured out the distance between the spoke from the rim and the lip. its hard to understand without the pics but theres about a 1inch lip that runs around the rim and the parts of the fat5’s go into it, i wanted the chrome lip all the way around so the parts where they connect to the lip i cut a deep thin gouge in it so this way the paint wont flake off. believe me, ive tried several techniques. and i feel with out this cut the paint is more prone to peeling off where the chrome lip meets the paint – also the cut line helps you to mask it off easier.
i had some bad curb rash on one of the rims, so i followd the technique used in the write up by using the bondo spot puddy. it fixed the problem pritty well. i just applied it over the scrape marks and sanded it down once it dried. the difference between me and the write up is that i used it on the rim part and he was using it for curb rash on the outside lip. NOTE: make sure you wipe off the loose particles.
now this is where the time and patience comes into play. if you want that chrome/polished lip appearence youre gonna need to do some masking. mask off the whole lip with regular old masking tape. make sure you tear off tiny pieces and go around the whole rim, go up to the cut mark and use that as ur guide. this took me the most time out of the whole project, about 30min a rim. i tried another easier more halfassed technique cause im lazy, using vasoline becuase paint doesnt stick to that. it worked, but i think that you get a more clean result from the tape so i recommend that.
after you fix all the bad spots in the part you want to paint and you have the lines cut into the rim i sanded down the whole inside part of the rim using 320grit sandpaper, i went up to the cut line, dont forget to get in all the cracks. this is gonna help make the primer stick to the rim. if u didnt know that much you should prolly think twice about doing this project. :giggle:
ok then after you have it all sanded down spray primer up on that beeoch. i used black primer which i feel is better because i used red before and in that event you get a bad enough rock chip it normally chips down to the primer and you dont wanna see the red if ur painting ur rim black. let it dry now. i did a couple coats of primer and i let each coat dry for about 5minutes- so it was dry to the touch
once its primerd up and its completely dry- i sanded it with a 600grit sandpaper to prep it for painting.
then i painted the wheel. my first pick of paint was engine paint because i thought being that it had a high temp rating it would be better however i found that this paint didnt work too well in the long run causing me to do it over again. i used just regular old dupli-color gloss black spray. - i sprayed several light coats making my total about 2cans for 4wheels, waiting about 5min between each coat. you dont wanna spray over wet because it will screw up the paint
once i was done with the color i wanted i decided to go with a clear coat. i picked the duplicolor one made for wheels. if you look you should see it, its the one with the picture of a wheel on the can. they also make paint colors such as silver and gunmetal but i could not find gloss black so thats why i used regular paint for the black and not the wheel one. i did several coats of this as well/ waiting for them to dry between each one. this should help against chips and what not. that doesnt mean go poking at it to see how durable it is, cause you’ll just mess it up and regret it, especally being that the paint has not settled fully.
once you feel the paint is dry let it sit for about an hour and peel off the tape and you should have a clean looking lip around the wheels. believe me mine look decent, i only had them like this for a day and i got about 15compliments. hopefully this helps. eventhough everyone says to wait 24hrs before driving im an idiot and didnt because im impatient, i waited about 3hours and it still looks fine. id recommend waiting though just incase.
finally 24+hours later i took the boxcutter and went over the cuts that i made prior. this should give a more defined look as well as helped give the paint an edge.
in total it probably will take you about 4hours. the write up if you read it spends several more hours then that and i feel my way worked fine as well. good luck. pics will be up soon ![]()
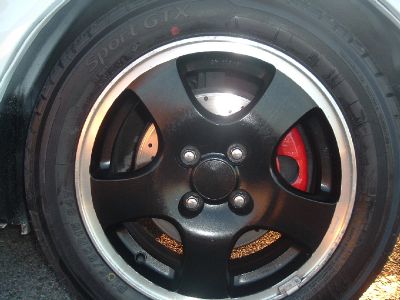
this is a bad pic but u can get the idea
i did something similar
i used aircraft remover and then sanded them down, painted them black and used a wirewheel to polish them. i did this because i accidentally curbed on a bit and like the polished ring look.
You can get away using a red scotch brite to scuff up the rims to paint. Paint chips due to bad prep work…