The factory alarm system on the G2 Acura Integra was made by alpine.
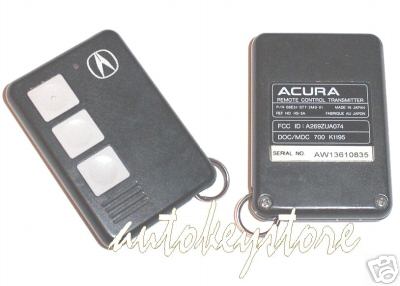
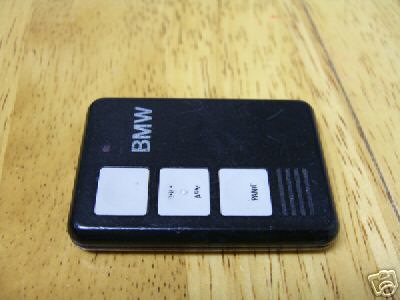
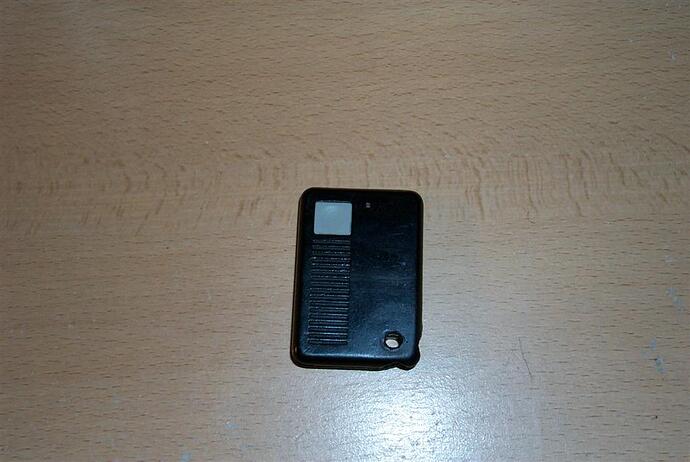
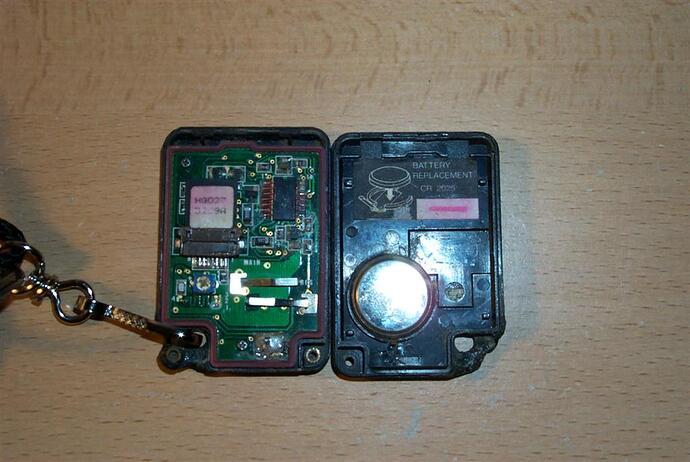
Signs of a factory alarm will be a valet momentary switch and honk when arming/disarming toggle switch on a bracket under the driver’s side dash, a red LED on the steering column in front of the gauge cluster, and the brain located under the glovebox and behind the passenger side knee panel. Remotes were Alpine one button and three button as pictured below. Remotes had one red LED and operated off a ROM chip system and used a CR2025 battery. The battery can be commonly found at most any drugstore. Remotes cannot be commonly found. ROM chips are even more scarce and should be cherished. Luckily you only need one to program the system.
Alarm had a glass break sensor as well as traditional door and trunk sensors. It did not have a hood pin or shock sensor but aftermarket units can be added. There is one unused alarm input which can be clearly seen if you open the brain. When you look at the brain, there are 2 harness inputs, a main input that carries power, ground, ignition, etc. and a sensor input that carries the signals from the door and trunk triggers. The extra unused input would be the prong on the brain’s sensor input which does not have a corresponding prong and wire on the harness plugged into the brain. Dip Switches for adjusting the alarm duration (30 or 60 secs when triggered) the exit delay (20 sec or 10 sec), entry delay (15 sec or 25 sec) passive arming (on/off) and the sensor cancel (on/off) are located on the brain itself behind the access door. I dont know what the other 2 buttons were for on the 3 button model. Possibly for locking and unlocking without arming the alarm. Holding the arm/disarm button for a few seconds activates the panic mode.
Although many have moved on from this basic alarm, some may still have it or want it and so I provide this info.
Note: the pictures may go down someday, but pictures of these remotes can be found pretty regularly on ebay.
The factory alarm system in my car was the one button version of this three button remote. The one button version had only the upper button but was otherwise identical.
Inside the remote in a small removable chip that houses the program to sync a particular remote with a particular brain. The remote will not operate without the ROM chip.
I searched the FCCID in google and found that the BMW guys had figured out the programming procedure. Perhaps it is detailed in one of the shop manuals for the e36 3 or e34 5 series. I edited the procedure to be accurate for our cars.
http://www.bmwe34.net/e34main/maintenance/electrical/prog_remote.htm
Your alarm brain MAY have a replacement chip already sitting in the slot. The slot is marked “fuse rom” and will either be empty or contain a replacement ROM chip identical to the one in the remote. This is good news if you ever need to obtain a replacement remote. For a long time I thought that the chip in the brain was necessary for proper functioning of the brain, but this is not the case. If there is a ROM chip in the brain it is only a replacement, a backup and you can remove it and place it in a new remote.
Procedure courtesy of Charles Brock.
If you buy a new remote, you will have to program it. The BMW dealer charges $115.00 to reprogram the remote. The acura dealer may not even remember how to do it or even know what/where the alarm is. Reprogramming price rates are unknown. I wouldnt waste your time unless you know that they know what they are doing.
See below for the acura part number and others.
Procedure
Tools: Phillips screwdriver.
New remote.
- Remove the passenger side plastic knee panel. The one that would be right in front of your knees - duh. Two Phillips screws at the bottom on either side and pull the panel back towards you. You will see two gold screws under the glove box. Remove these to release the alpine alarm box located behind the passenger side metal knee panel. Reach under the dash and behind the metal knee panel and bull the brain out.
- Flip the box over and you will see an access door.
- Open the door carefully: you will see a small black button and a small slot where the remote chip (eprom) is placed.
- Remove the 2 Phillips head screws from your remote fob. You will see a small circuit board, a battery and a chip. This looks like a very small ram chip on a PC. Carefully remove the chip from the remote and plug it into the empty chip slot on the alpine alarm box with the bulge side down.
- Put your key in the ignition and turn it to the 1st accessory position (Do not start the car). Go back to the alpine alarm box and hold the black button down for 10 seconds. Remove your key from the ignition.
- Remove the chip from the alpine alarm box and put it back into the remote fob.
- Re-mount the alarm box and seat bottom. This is it.
Alternate Procedure from Steward E.
- Open the remote by removing the two screws and flip the cover open. If the battery comes out of it’s position, make sure you put it back with + facing the correct side.
- Remove the chip that is to be programmed. It has a white label with a serial number on it. The chip might come out easily, or you might have to use a small screwdriver to open the socket. The small plastic socket has a front end that can slide out if you pry gently with a small screw driver. This will make it easier to remove the chip.
- Remove the back seat of the car (because the alarm unit is under it). The seat cushion is removed by locating the securing clamps, one on each side, roughly in the middle behind the front seat and at the lower end on the front of the back seat. Once you’ve located the clamp (you can feel where it is, but you can’t see it), grab the lower end of the back seat at that point and pull hard up.
- The alarm will be under the beck seat behind the driver’s seat. Use a 7mm wrench to loosen the two screws on the bracket in front of the alarm. When the alarm is loose, turn it upside down. Open the small plastic panel. Now you will see a socket identical to the one in the remote. Insert the chip in this socket. Be careful and make sure it is inserted correctly. Turn on the ignition on the car. Go back and press the small button to the upper left corner of the chip you just installed. Hold the button down for just a few seconds.
- Turn off the car’s ignition, remove the chip and install it into the remote. The remote should now work.
- Install the alarm unit and back seat and you’re all set.
note: second procedure is unverified
If you are searching for more info on the alarm system, the following info may be helpful:
It was used on some Acura and BMW models between ~1990 and ~1995
It was also supposedly used on some land rover and saab models of the same time period.
These FCC ID and part numbers may be helpful.
Acura Part 08E50-Sk7-200 one button factory remote
FCC ID- A269ZUA089
Acura P/N: O8E51-ST7-2MO-01 three button factory remote
FCC ID: A269ZUA074
3 buttons remote BMW p/n: 88-88-1-600-292
It should also work for the older same looking remote
BMW p/n: 82-11-1-467-015.
Compatible 3 button remotes:
ALP-3BB
REMOTE MADE FOR: ALPINE ®
BUTTON: 3
LED or LIGHT: RED
FCC ID: A269ZUA054
P/N - MODEL: SEC-8448A
ALP-3BC
REPLACEMENT THAT WORKS FOR ALPINE
BUTTON: 3
LED or LIGHT: RED
FCC ID: A269ZUA061
P/N - MODEL: SEC-8400A
ALP-3BD
REPLACEMENT MADE FOR ALPINE
BUTTON: 3
LED or LIGHT: RED
FCC ID: A269ZUA071
P/N - MODEL: SEC-8441


