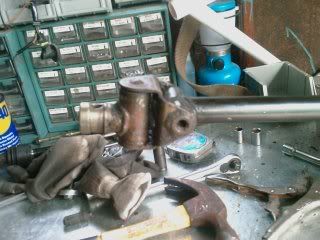
Since I bought the car it had a very sloppy shifter. It was so sloppy, I occasionally would put it into fourth trying to go to second. Also when it was in gear the shifter would wiggle in every direction like it was in neutral. I hit the forums and the only thing I could find was that everyone said that the rubber bushings would give out. Well I jacked up the car and started looking around. I found that the u-joint where the shift linkage attaches to the transmission was basically shot. I could grab it and shake it. Not good. I decided to rebuild it.
Tools needed
Bench vise (I went and bought one at Sears for $64.00)
Grinder or cutting wheel
Punch or screwdriver
Rachet with 13mm socket
13 mm wrench or crescent wrench
Parts needed
(1) 5/16 bolt 2.5 inches long- .23 @ HomeDepot aka “Race depot”
This bolt is in the bins on the bottom. The expensive bolts are in the drawers. This bolt has coarse threads, which is (-18).
(1) 5/16 coarse threads (-18) nylon lock nut- a 2 pack was .98 @ HomeDepot
These were in an orange bag hanging on the hooks at about eye level
(6) 3/8 washers – probably about 2.30 +tax @ autozone
(8) 5/16 washers- 18 pack is 2.30 +tax @ Autozone
These are the 5/16 washers that are only about a half inch in diameter not the big wide ones
(1) short 13mm socket 3/8 drive-can’t be any wider than 18mm.
The height on this socket was 26mm.
Now you might wonder why the 13mm socket? The part that needs to be rebuilt is 38mm deep. The 5/16 washers are only about 1.5mm thick. That’s about 25 washers. So I found a 13 mm socket and it is the same diameter as the 5/16 washers and it was 26mm high. So I got out of using a crap load of washers.
Remove the shift linkages from the car. There is a great write-up on this page
http://www.performanceforum.com/wesvann/honda/bitch/bitch.html
IMPORTANT: PAY ATTENTION TO THE ORIENTATION OF THE LINK TO THE SHIFTER ARM
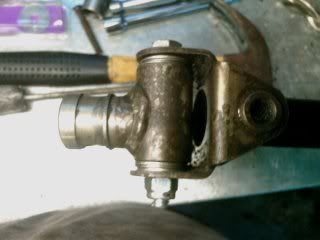
Separate the two linkages and place the one we’re working on in the bench vise. There is a pin that holds the link in the u-joint. One end of that pin is a flat piece and the other is a half circle nub. I chose to grind off the half circle nub end instead of the flat end but it really doesn’t matter which end you do. Be careful not to grind through the edge of the u-joint when grinding off the nub. Once the nub is ground off, use the punch/screwdriver and a hammer to drive the pin out. It comes out very easily.
This is what was inside the link.
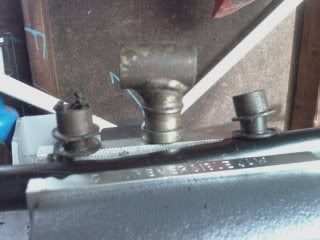
The two outside pieces had a rubber insert inside a hard plastic insert. They were shot.
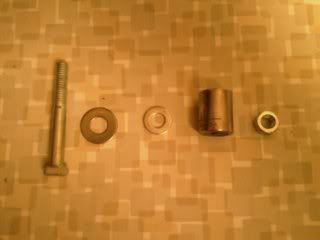
New Stuff. (1) 5/16 bolt, (8) 5/16 washers, (6) 3/8 washers, 13mm socket (or equivalent substitute) and nylon lock nut.
This is a drawing of how everything will go together
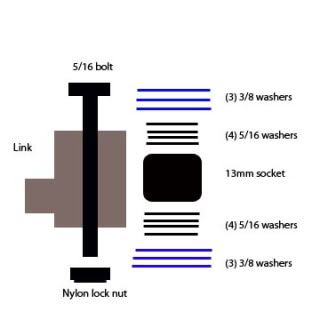
Grab the link and put the socket in first and then put (4) 5/16 washers on top of it and (4) on the bottom of the socket. I then put the bolt in pointing down in relationship to the shift rod being on the car. I did this so that there would be enough clearance for shifting. I barely put the bolt in and then slid the (3) 3/8 washer on the tip of the bolt. I slid the link into place, MAKING SURE IT WAS ORIENTED PROPERLY. I then slid the bolt through the link until the tip was sticking out. I put the other (3) 3/8 washers on the bottom of the link and slid the bolt all the way through the u-joint/link. Screw on the nylon washer. I tightened it down until the link would barely move. I didn’t want it to fling all over. I tightened it all the way down and then backed it off about a ¼ turn. You still want it to swivel and not be bound up. Now there will be about a 1mm of play pulling the link front to back but it is not noticeable when shifting the car.
I hope this info will help alleviate some frustrations. For anyone wanting to try a different rebuild method, the link is 38mm deep and 18 mm across.