The Ultimate Battery Relocation

UPDATE:

With my car off measuring with my multimeter I got 12.63 on a warm day at the battery, 12.63 at the front of the car.

With the car on i got a perfect 14.39-41 at the battery and front again, and this was with a few accesories on and a highend pioneer headunit.

Materials:

20 feet of 2 gauge wire (99c/foot at Home Depot)
2 feet of 8 gauge wire (Don’t remember, cheap though)
Various ring terminals ($3 for a pack of 4, Parts Express)
2 car audio battery terminals (to accept big wire, $4, Parts Express)
1 DB048 power distribution block ($15, Parts Express)
1 100 amp circuit breaker ($40, Parts Express)
Zip-ties

Lets dive in shall we? Before we start, big wire is hard to bend. Use zip ites to secure in certain places you choose.

My factory ground was toast! This is what the ground looks like underneath your factory battery setup. It grounds to the tranny.

You will soon have all this room for your turbo air filter or just to look good.

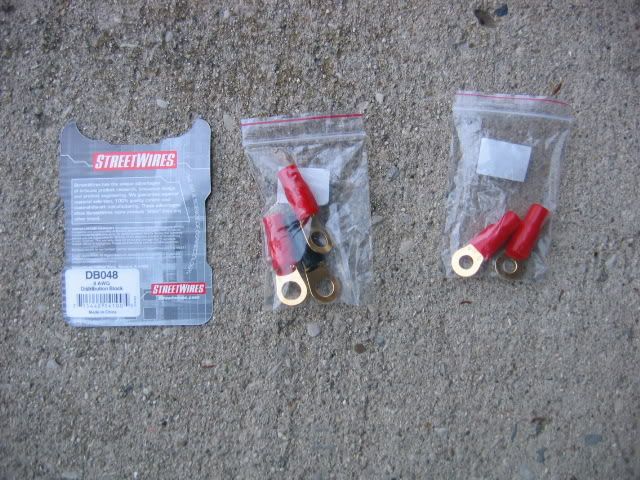
These are some parts I used
Plan your wiring path. Here is mine.

Plan to make this turn BEFORE the ECU. It is much easier and will not bulge up out of the carpet. Under the ECU there will be a ridge. Route it along that.

Now the firewall. My car was a GS and some of the holes in the firewall are filled already by accessories. I found a hole behind my intake manifold. The hole is there in the metal but the rubber doesn’t have a hole in it. Instead of doing a lot of uncomfortable hacking and slashing under the dash, I did this. Take a screwdriver and puncture the firewall rubber. My hand is the firewall.

Pull it through under the dash. It will come out a bit above and to the right of the driver pedal.

READ THIS WHOLE STEP FIRST! Now, cut your factory positive wire as close as you can to the factory terminal. You will need all the length you can get. The factory wire is two wires together in a loom. Approximately somewhere near the distributor there is a junction where the wires split off. Take all that apart BEFORE you cut ANYTHING! I tried to cut the junction for awhile before I realized there is a metal piece around it. It comes off by a bolt to the left. take the metal off and then cut. I used my 2 feet of 8 gauge for the fuse power and reused the factory wire for the starter.

Use a piece of the factory loom cover to protect your power wire as it goes through the firewall. You don’t want the line to get chaffed.

Take off your interior panels. route the wire under the carpet and down the passenger door like in the above picture. After the door take it behind the frame peice and continue the wire through to the trunk area. Notice the two Zip ties.

Put some thick tape along this ridge. Again, you don’t want to chaff the line.

Take this time to tape down this drain tube. It drains water from your sunroof. Mine was very loose. You don’t want it to come out and turn your trunk into a pool. Especially with your battery back there now.

Back up to the front. Notice how obvious the distribution block is. I took the package it came in and cut it up a bit and painted it. I wanted it to look more stealthy. Also you must mount your distribution block on the firewall.

Ta DA! This is with flash though. In person in is not noticeable.


To the back again. Take a look at the picture. The reason I mounted the circuit breaker up high is because I wanted it out of the way of being hit by something moving around in the trunk. You don’t want something in your trunk to hit the button while driving. Instant dead car. Also, by being up high underneath your cover, it is less likely to be seen by a thief. Remember though, this thief just spent a load of time under your hood thinking the battery was there.

Make some holes in the plastic. Two holes for each mounting hole. Use your zip-ties. They will be more convenient to cut if you need to take it out rather than screwing something down. Make yourself a nice ground. I chose one of my strut tower bolts(ring terminal).

“WHY A CIRCUIT BREAKER AND NOT A FUSE?”

Do you want to spend money continuously replacing fuses? With a circuit breaker it is very convenient. When the switch is open, the power is off. When the switch is in, the power is on. No more disconnecting your battery to work on the car, just press the button. Not feeling safe somewhere? Take your under hood fuse and open your circuit breaker. How nice!

Now it is on.

Pretty much a finished product.

Now with the cover.

ATTN! This type of battery is not safe to drive with because it is not sealed. I am not driving this car yet. This was used just for the write-up. I am going to purchase a dry-cell battery. If you want to do this you should use a dry-cell or sealed battery.

A farewell shot for the day.

Could you post prices for everything, and possibly where you got all your parts?

Josh

This is what is in store for my next write-up for you all.

Buy an Odyssey PC680MJT.

^What is that?

Josh

Google.

15lbs.

Updated

Now lets get some discussion going on!

Beautiful job, thanks. You should get a box for that puppy, and good as it is, the setup won’t pass track inspection.

Awesome write up! I might have to do that but…do I need to remove my entire interior? :giggle: when are you getting that thing back on the road?

nice write up, i saw one over here too:
http://g2ic.com/forums/showthread.php?t=123660

:giggle:

bump, Nice

Well,. I went to my local track last weekend,

Drove up to the tech inpection, expecting for awuestions,

The guys says “Fill this out”
He puts a # on my window and I leave, lol :shrug:

Just because you passed at one track, doesn’t mean your car is safe.

is the breaker nessecary?

wont the fuse do the same thing?

…Read. The fuse will blow and then you will have to buy a replacement fuse. The breaker doesn’t blow it just pops open, so all you have to do is reset it.

of course guys we have seen this many times right. the idea , well to better say hes intentions r good, but the job could b done on a better way.
im not hating ok , i clear that up.
but u should have build a box for the batery, that way if anything the batery will b close, but of course make some vents so the batery b able to bread.
circuit breaker u could find a better place for it.
one thing to REMEMBER is , why u going to have ur car looking nice inside n when u open ur trunk or hatch its going to b a miss or a cheap job done on it.
thanks

what is the purpose of this “power distribution block?”

Alright…in my opinion its the best/easiest way to split the power to the starter and to the fuses and whatever else you may want to do later in the future. Wire of a large size is not just something you can twist together and wrap with tape you know. If you wanted to get extreme…you could solder the wires together thats up to you.

I really don’t feel like making a picture so I’ll explain best I can. From the factory there are two wires together in the loom for the positve wire. One runs to the starter and the other to the fuses. When you move the battery further away you have to use larger wire to keep the resistance low. Thats why I made the power wire seperate (distribution block) under the hood, instead of earlier in the wiring path. This way I can have the longest length possible of large wire.

Where is the starter wire? and how did you make the connections? Solder?

It shows in the pictures. Get under your hood and you should figure it out.

As far as the connections:

Front end ground was done with 2 ring terminals. Power wire> dist block= tighten down> starter, fuse wires.

Rear ground. Ring terminal under strut bolt> battery. Power wire> ring terminal to circuit breaker> ring terminal out of circuit breaker> battery.

Look at the pics.