Here is by far the easiest way to install a type R rear swaybar on your 2nd gen. NO removal of the gas tank required. The only part that requires special resources is making the spacers.
Tool list

Corded drill for more power.
Bubble level that can be used vertically.
Various pliers.
Tin snips, or something that can trim your ABS brackets.
Jack, jack stands, and squares of plywood for the stands to make the car perfectly level.

Sockets and crescent wrenches to fit the nuts you selected.
10, 12, and 15mm sockets / wrenches.
11/32" Drill bit for the bolts you selected, no longer than 5 3/4 inches or you risk puncturing your gas tank.
Hardware

Type R bar (22 or 23mm), D brackets, and bushings.

2 custom spacers that fit the dimensions below. I used my school’s machine shop ![]()
http://geocities.com/bretq/swaybar_install.html
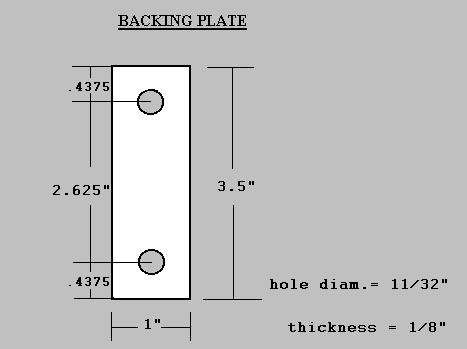
They need to eventually be 1/2 an inch thick, so stack many thin ones or make one fat one like I did. *Make sure to round one corner off.
4 bolts that fit your 11/32" holes of the shoulder type, grade 8.
2 will be 5 1/4" long, other 2 will be 4 1/4" long.
A lot of grade 8 nuts that fit the bolts chosen. Nuts can be stacked on each other for locking effect. I stacked 3 nuts on each bolt (for 12 nuts total).
Big flat washers that fit the bolts.
-
Vehicle preparation
Spray the underside of your car to get road grime off. Note the surface that the swaybar will bolt to, as well as the crevice behind the gas tank. Jack up the rear of the car, making sure the OEM swaybar sits perfectly level with your bubble level. Adjust the jack stands with the plywood. -
Lowering exhaust and OEM swaybar

Undo the 3 rubber exhaust hangers that look like this. Use the jack if you need less tension on the rubber. Unbolt the OEM swaybar at the eyelets and L brackets with the 10, 12, or 15mm sockets / wrenches. -
Drilling to the rear subframe

A hole will need to be drilled where the bolt is shown above (far right one). Therefore the ABS brackets needs to be removed and the subframe cleaned. Put the 11/32" drill bit in the drill so that when it penetrates the rear subframe it has no chance of hitting the gas tank.

Drill that 11/32" hole as straight as you can right through the rear subframe. This hole will be the bottom mount point for your D brackets and spacers. Bolt the bottom of the custom spacer on, and with the bubble level figure out where the top hole should be. Go to town with the drill again! -
Bolting the new swaybar

Here is the passenger side mounted. The eyelet bolts like OEM. For the tail-end of the large bolts, stack as many washers and nuts as you can in the crevice behind the gas tank. You should be able to get about 2 washers and 3 nuts on all the bolts. When tightening the nuts, tighten them against EACH OTHER, not the rear subframe. Use threadlock if you are anal, but I didn’t use it. The abs bracket needs to be trimmed before bolting back in its askew position as shown.

Here is the drivers side. I tied the abs line off with nylon string. You probably want to use something better
Notes for improvement
Custom backing washers are recommended. Then you can choose the grade of steel and thickness you want. I would make washers out of 1/8" steel with a 2" diameter. Of course bigger washers will distribute the load better.
Polyurethane and metal bushings would make the bar’s movement more precise, but can cost a lot more and make the bar “stiffer” and thus more oversteery. Heim joints have been recommended for the eyelets to LCA attachment, but those cost a lot too.
My other reference:
http://www.g2ic.com/forums/showthread.php?t=124417&page=2
Handling opinion
Easily better in every way. No threat of snap oversteer, well almost. Car is flatter in all situations, but strangely since there is less side wallowing the ride has been improved. I have skunk2 sleeves, 500 lb front springs, 400 lb rear springs, lowered about 2 inches, and koni yellow shocks. Here is a video of an autocross I did. Note my steering inputs are always smooth, further proving there is no snap oversteer. After the final timing light there was a sharp corner requiring heavy braking and turning together. Here was the only time I cold get oversteer, but it was still controllable enough to stay in bounds.
http://www.youtube.com/watch?v=atoojBVQ_hE