i just pulled on the ducts and the flexed and came out.
just dont forget to put them back, i did and its not worth it to me to drop everything again for the far vent to work, though i do miss it
i just pulled on the ducts and the flexed and came out.
just dont forget to put them back, i did and its not worth it to me to drop everything again for the far vent to work, though i do miss it
I’m sure you’ve probably done it, but you did remember to remove the pin that connects the pedal to the rod right?
Yes I removed the pin. The assembly is free to move. All fasteners are out but the rod that attaches to the brake via that pin is the problem. I can’t move the assembly back far enough to clear that rod. I am going to try prying out the one heater duct closest to the assembly as suggested by lksdG2.
Even though the ducting seems rigid, you should be able to bend it to get it out. It’s the type of plastic that you can distort without breaking and sort of bend back into shape.
Ok, thanks for the advice.
well, for me, this is the only option i have right now. I’m soon to be 16 and i have a '92 Sedan and i want a 4-door cause through high school it’s nice to have a 4-door. But mine is an auto and when i searched for a manual sedan… no luck at ALL. If i can manage to find a manual sedan i might go for it but my car has about $3500 under the hood already, as i i bought it with the stuff in.
I am getting there. The pedal asssembly is in, the clutch cable is in, the steering column is back in place and the wiring is done. I am held up waiting for a part for the tranny. Its the shift fork spring. I have a couple of them but they are worn enough that I wanted to buy a new one at the last minute. I have already got about $1500 Cdn invested in the tranny so another $5 won’t bother me. I would hate for that spring to break. I do not plan to ever take this engine out again. After reading another thread on here regarding changing the color of the gauge cluster lights, I am going to do that. I have a GSR cluster that will replace the automatic model.
Thanks for the advice on the heating ducts. They did bend on removal and they did go back into place.
does anybody have pic of shimming the pass. side mount
i did it but must have done it wrong cuz the angle wore out my differential till the axle would no longer stay in and it came out on the freeway and smashed a hole in the case. it couldnt have happened at a worse time either.
i wish i would have bought the conversion mount when i had the money but now its too late and ill be trying to shim again… cuz even buying the new tranny ill be stretched.
/rant, anyways if possible buy the conversion mount. if not shim it good and right the first time
just curious anyone have any updated pictures of this process? i browsed through the 20 some pages and no pictures anymore. and also anyone have any diagrams for the wiring changes that need to be done and/or an acurrate list of all the wiring changes needed?
ive gathered that everything for the manual is already there for the 5 spd though, is that right?
I did this swap 2 weeks ago. I dont have any pics but i recommend buying the conversion mount. As for wiring im still trying to figure it out. Right now all i have done is connect the 2 fat black and white wires and my car starts and drives so im happy for right now.
alright…yea i planned to get the mount kit cant go wrong with better monts all around ![]()
which 2 fat black and white wires are those?
I did take some pictures. What do you need?
You can do the wiring by making use of the connector thats on the end of the automatic shift selection switch. Its the white plastic thing mounted on the right side of the selector and has 8 or 10 wires (I am doing this from memory) coming out to a two in one connector. This is what I did.
Cut the connectors off of the shift selector switch leaving about four inches of wire at the connector end.
Shift/Key lock problem - At the shift selector switch connector solder the grn/wht wire to the blk wire. This simulates being in the park position and energizes the interlock control unit so you can remove the key.
Park/Neutral Start - At the shift selector switch connector solder the two thick blk/wht wires together. This simulates being in park or neutral so the starter will work. I should point out here that I did not use the clutch lockout switch. I am an old guy and in the old days we just made sure we had the tranny in neutral or the clutch in. There wasn’t a switch. If you decide to put one in, your wiring is a touch more complicated. Back in this thread one of the members described using a relay. The manual tranny cars have a relay, the trigger for which comes from the clutch switch. It is said in that post that its so the current does not have to go through the key switch. Actually its so the current for the starter solenoid doesn’t have to go through the clutch switch. Enough said about that. You can look for yourself.
Reverse lights - This is a bit more complicated. I used the two existing wires that run to the lockup solenoid on the auto tranny. One is red and one is grn/blk. Trace those wires back to the connectors for the tranny computer. The tranny computer has to come out to make room for the pedal assembly. Cut those two wires off the connector. They are at B3 (red) and B8 (grn/blk). The large tranny connector is A and the smaller one is B. Looking at the connector from the wire end, they are number A 1-8 across the top row and A 9-18 across the bottom row and B 1-5 and B6-12. Now go to the selector switch again and look for the Grn/blu and Grn/blk wires. They plug into the tranny computer at A4 and A3 respectively. Cut those two wires off the tranny computer connector. Now at the tranny computer connectors solder the red wire to the grn/blu wire and grn/blk wire to the grn/blk wire. Now you have a continous wire from the engine compartment to the shift selector switch connector. At that shift selector connector the grn/blk wire goes to the backup lights. All you need now is power. The yellow wire at the shift selector switch cable is a power source. Solder it to the grn/blu wire. Once you plug in that shift selector connector again, you will have a circuit made for the backup lights. You only have to now connect those solenoid wires in the engine compartment to the backup switch on the manual tranny. You can hard wire them or use a connector from another backup switch or make a completely new connector set. Your choice. Back at the selector switch connector, you can cut off the wires you haven’t used and tape them so they don’t accidently ground or short on something. Plug the connector back in the way it was for the auto tranny shifter and you are done. You don’t need anything else from the auto tranny setup. The shift lock connector and the S3/S4 switch connector can be removed with the shifter assembly.
If you want, you could use that connector as a theft deterrent. When its disconnected, your car won’t start and the key lock is locked. You would have to lengthen the wires to make it accessible from outside the console.
Hope this helps.
Forgot to say that I used the Innovative steel mount kit with the auto to tranny mount replacing the standard one. I found them to be of good quality and a perfect fit. On the drivers side you have to find different nuts/bolts because the Innovative mount bracket is of thinner steel. The unthreaded part of the stud sticks up too far on the Innovative mount, hence the nut can’t be tightened down fully. I removed the stud and replaced it with a bolt. That was the only issue.
awesome thanks. i think that about answers anything FOR NOW heh heh. i havent got to the project yet, i still have to buy all the parts and tranny, but im researching now and finding out what ill be getting into. i wont be worried about a clutch switch either. as long as i can get it to start, have back up lights, and run right i’ll be happy hahaha it’s looking like the reverse lights might be the only tricky wiring to figure out, but not impossible.
as far as pictures IF you want, pictures of all the connectors pointing out the wires you mention so i can relate your description to the pictures and also with what i have in the car. But if not no worries i can figure it out when the time comes to take it all apart.
also thanks for the heads up on the Innovative driverside mount issue. that’s the kit i plan on using as they have a direct bolt in auto to 5spd conversion mount (no cut and move)
i read something about the shifter assembly needed…is this special for the 5spd or is the auto one used?
any insight on this? i pretty much know everything else i need to do and get for the project otherwise
You need the 5speed shift assembly which consists of the shifter, shift rod and stabilizer. The automatic shifter is removed. Are you sure you are up for this swap?
yes i am, i’m just getting an idea of all the parts i need, and make sure i dont get into it and not have all the parts i need.
i like to understand and have a visual of how it all works before i even get into. if i had someone that had a 5spd DA here i would just look at how its all set up that way and have no questions here, but since i dont im asking in a place where SOMEONE should have an answer for anything. I’ve been to college for auto repair and have rebuilt and installed a number of trannies and motors, so doing it isnt even difficult. BUT all vehicles are different in some way and ive never worked on a honda specifically so im just trying to make sure i understand how its all setup and how it works on my specific car
i guess i wont ask how the “t” bracket on the back of the block is incorporated in to everything and what its for either
http://www.honda-tech.com/showthread.php?t=2304301
for future lookers so noone will have to ask anymore as long as those pictures there stay good
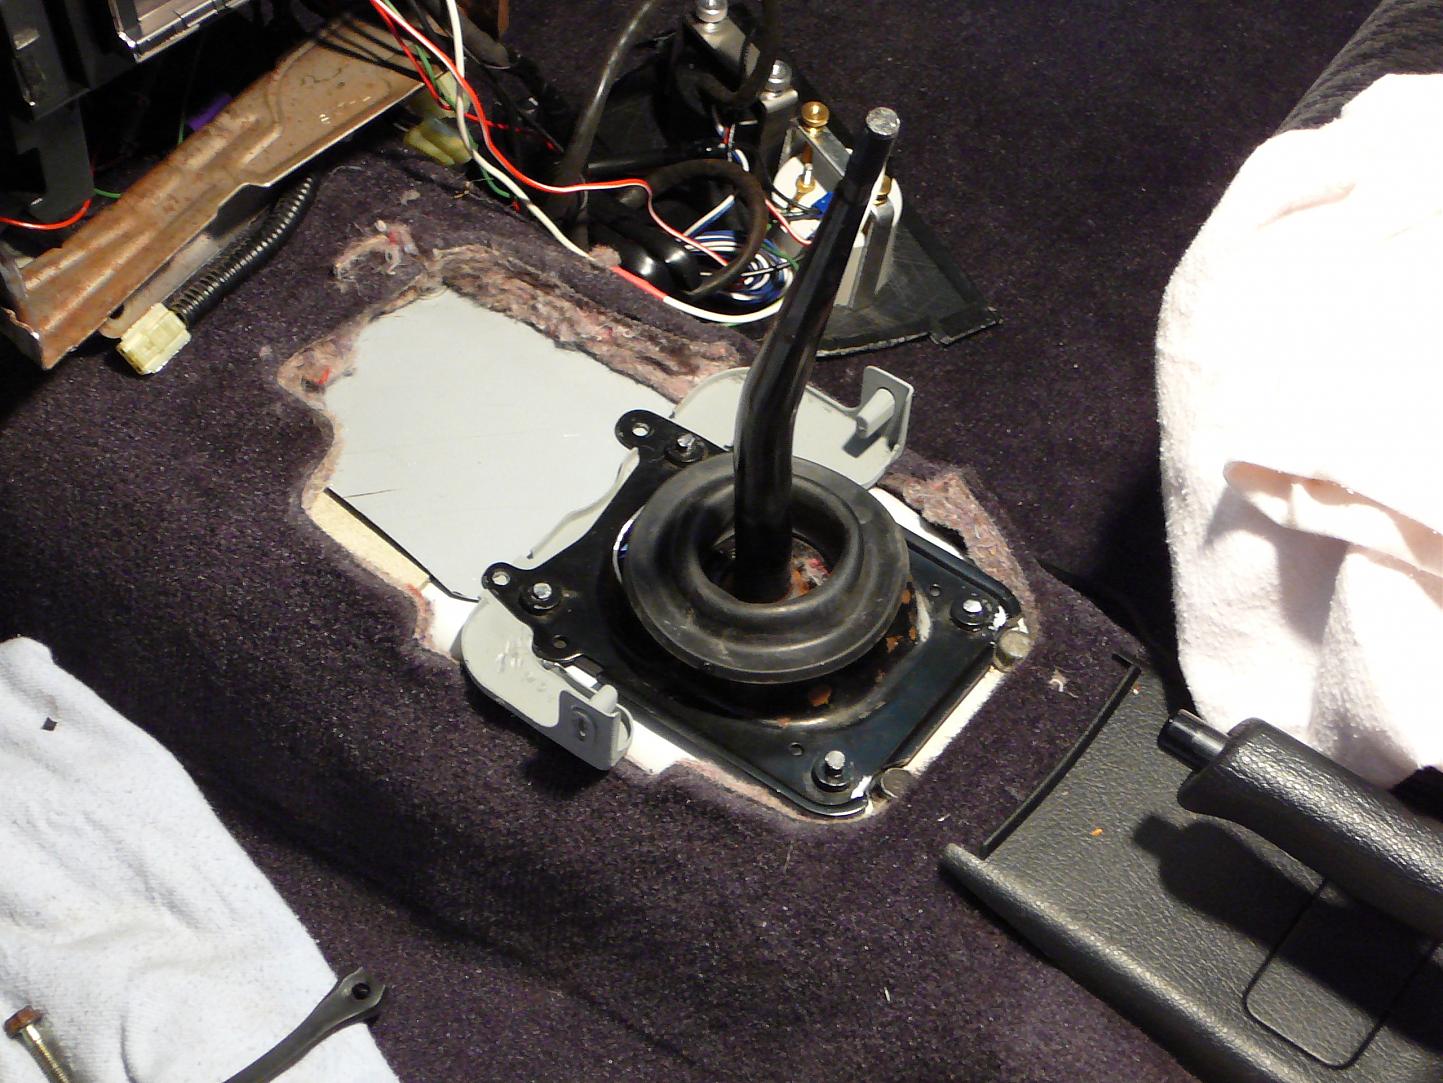
With respect to the shifter sitting in the hole created by the removal of the automatic shifter, you can see in the picture on the Honda-tech site that the hole is quite large. I was able to reduce the size of the hole by cutting the bottom off of the automatic shifter holder and then flip it over, cut off the mounting bolts, and re-install just that piece using new holes where required and new bolts. You then have a hole that is about the same size as the 5speed hole and you can seal it properly with the rubber boot from the 5speed shifter. That keeps the noise and fumes from entering the car. You still have to block the other hole where the automatic cable passes through the floor. A small piece of sheet metal will do that. The light colored material in the picture is covering that hole. It is a piece of sheet metal used by roofers to seal chimneys and such, easy to seal.