I fixed it again! Here’s what I did this time:
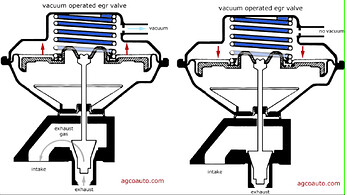
Given the symptoms I was experiencing while driving, my assumption going into fixing this the second time around was that the EGR actually was not operating correctly and this isn’t a case of a bad ECU or wiring connections. I read up on a bunch of forum posts and watched videos about different EGR types and learned that mine is a vacuum operated EGR valve:
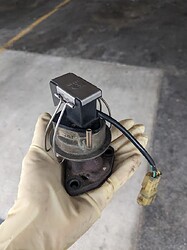
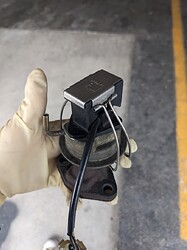
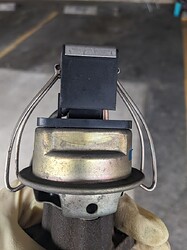
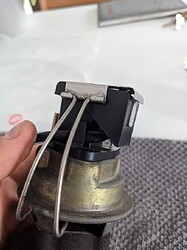
So for the valve to operate correctly, a vacuum needs to exist in the upper part to pull the valve open against the spring. So here’s my EGR below, complete with the valve position sensor on top of it which the ECU uses to check for the appropriate voltage (higher voltage means valve is more open) at different driving conditions (ex: idle versus driving at 2k rpms). I noticed before that the topper wasn’t exactly on there particularly tight, I could nudge it around with little effort and so I thought maybe air was escaping there and not allowing for a proper vacuum to exist, resulting in the valve not opening as much (if at all) as it was supposed to, resulting in decrease performance and for the ECU to throw a code basically saying “low voltage, EGR isn’t working properly.” I grabbed a straw and just tried blowing into the vacuum inlet (the little L shaped thing sticking out of the middle section below the black sensor). Sure enough, I could hear air and feel it coming out from in between the sensor and the diaphragm housing below it. In the last image, I tried to capture the loose fitting of the topper, which had a big enough gap that I could see light on the other side. When I pressed down on the sensor to tighten the seal more, I no longer could blow into the inlet, suggesting that it was air tight in there and would hold vacuum. Seemed like I found my problem!
One user on a Prelude forum said that he fixed this by replacing the triangle gasket on the sensor with an o-ring that he managed to squeeze into it to create a better seal to hold the vacuum. My plan was to try the same, but my AutoZone didn’t have o-ring sets so I instead went with a different solution of just figuring out how to fix the sensor more firmly on top of the diaphragm housing. You can see that by default, just those two clips on either side of the sensor topper push down on the sensor. My thinking was that if I could tighten that seal by adding force downward on top of the sensor, the same way I did with my hand when blowing into the inlet, then the vacuum would function as it should without any leaks.
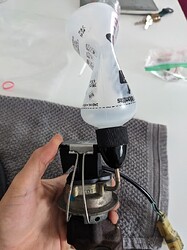
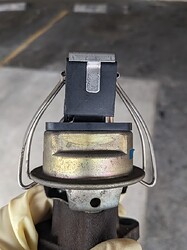
You’ll see that the two silver clips that hold the sensor down are attached to a single metal plate, which goes on top of a rubber cover which encases the plastic sensor housing. In between the rubber cover and the metal topper, I added a very small flat piece of metal to add a bit of height, creating more downforce and tightening up the seal between the sensor and the diaphragm housing when the clips are locked into place. Please be kind about my creative vacuum tester in the middle image, which shows that the diaphragm is now air tight as the plastic squeeze bottle doesn’t fill up with air. The far right image shows that the gaps that were there before are no longer there so air should not be able to escape from there anymore.
I put everything back together, reset the ECU with the same procedure as before (disconnect battery + pull ECU fuse, wait for a few minutes, reconnect, wait for a few minutes, start and idle for 15 min til at operating temp, stop engine), and then took it for a drive and did not get a CEL! Moreover, the car was driving with good power, shifted through all the gears, and I was not hearing any air whoosing when coming to a stop. Crossing my fingers that this fix will last!
