rollinmyda's build thread

great work on the seat rails. The seats should sit at stock height like the oem since your using the same seat rails. You don’t need to use the slider that come on the aftermarket seats since your oem brackets already have the slider.

Nice lights. I want to see some backside pics. lol :up:

So you used the Evo rails? Or the DA rails? Or you just joined the two rails together? I’d be interested in pictures if you can find any!

I’ll have to check those out. You definitely have some patience! I never thought that light was going to see a car again… Haha

You know I didn’t even notice. I want to say they’re still in there but I’d have to double check.

I know I could technically just upgrade to a 1" master cylinder from a DA but I really don’t like the design of the DA unit. I am going to be ordering a bnib ITR MC which has the different bolt pattern to the booster so I need a matching booster in order to use it. If I’m going to be sourcing a booster anyway I might as well keep with the original booster meant for a 1" MC so pedal effort/travel is the same. I haven’t mentioned it yet but I’m going to be doing the legend brake upgrade which is my reason for upgrading to 1" MC.

Thanks! I think they should be fine but I’ll be adding a little material so hopefully the seat doesn’t raise up noticeably.

Haha, I think youre familiar enough with the lights to know what they look like but I could post a pic showing how mint the backs are too. I’ve never seen a set with housings this clean before.

I forgot the way they looked. hahahah The lights should have the fog light covers. I never open them and when I first bought the lights, they didn’t looked like the plastic lenses had ever been removed.

The way you are doing it will work. All you need is to weld 2 vertical rails to the stock rails and bolt up the seat once everything is welded. The finish result of the seat rail should look like a number symbol #

I ended up cutting off the tab that was wrong and bending it, then having it welded on again. They apparently didn’t know there was a floor pan difference so all they offered me was the option to return them.

Aftermath- They’re virgins! Lol. I’ve had a bunch of sets and 90% have been opened up, spray painted, hacked up, etc. I’m so glad I got these from you! Many, many thanks! :up:

Boltonhonda- that sucks man. Come to think of it though, while looking at my options for rails I remember seeing one type of rails had a disclaimer stating that they were made for US model DAs only. Huh, I guess thats why

hahaha virgins. Not so many out there anymore. lol

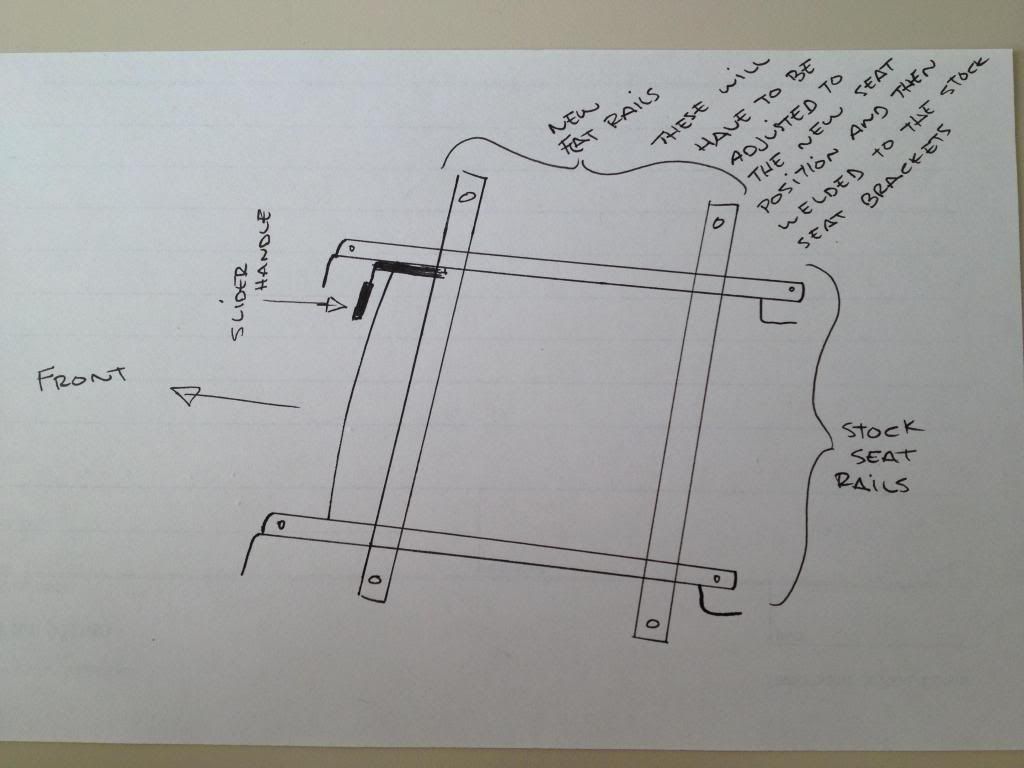
I used the evo 2 sliders and I drilled out the spot welds on the feet off the DA rails. I mated them right to the sliders from the EVO. The EVO sliders are now DA rails I first bolted the feet to the rails to get the position correct then I welded them.
I have to look for pics. They came out quite ugly due to using a flux core welder but they are strong and they are hidden under the seats lol.

but it doesn’t even matter anymore because the Recaros are no longer in my DA

[QUOTE=rollinmyda;2310330]I’ll have to check those out. You definitely have some patience! I never thought that light was going to see a car again… Haha

You know I didn’t even notice. I want to say they’re still in there but I’d have to double check.[/quote]

Yeah it was pretty annoying trying to get the lens perfect but the hardest part was making the housing seamless and not need paint.

You have had a few sets of Stanleys, can you tell me if the USDM lower brackets will bolt onto the one piece housings? I never tried it and now that I want to know I don’t have my USDM lights out here with me lol.

Oh I got you.
but from my experience with upgrading master cylinders in multiple chassis the pedal effort change is not noticeable with or without the type r booster.
on my ej6 sedan I have a type r mc and it feels fine with the stock booster. that and the standard dc2 booster will work just as well and are way easier to come by.

The Legend brake upgrade is an awesome choice. Much cheaper than the NSX and they are the same calipers. Just so you know don’t waist your time flipping the calipers to make the pistons go in the “correct” position. It is the most retarded debate ever. The pistons move out of the calipers at the same rate and the minute size difference between the two pistons doesn’t affect the wear of the pads. I firmly believe that the only reason for the different piston sizes is for pedal effort and master cylinder size. The two pistons are identical in surface area to the single piston type R calipers but they just push the load much more evenly across the pad. So in order to save time and money I think Honda just kept making there 1" master cylinders instead of increasing the second piston size and needing to make an odd master cylinder.

So in short just position the calipers so that the bleeders are up to like it should be.

Or do what a friend f mine did and drill new bleed holes on the bottom and seal the other bleeder holes. PITA and not worth the time and effort. lol
And having to flip the caliper up and put a block of wood in it to bleed is really annoying. I like being able to bleed the brakes with my wheels still on the car but that’s me.

Also if weight is any concern to you I was able to shave a total of 2 lbs off of my legend calipers.
I shaved the calipers and brackets with and angle grinder.

Also the whole mini or corrado rotor idea works but becomes trouble some without proper ducting to the fronts. Yes the use of either rotor will allow you to not have to re-drill or order custom prelude rotors and will eliminate the need to shave the caliper brackets but the fact that they are thinner than the Honda rotors they do heat up much faster and are much more likely to warp. I had both the mini rotors and the corrado rotors on my DA and I hated them. I had to machine the corrados three times because they would overheat on me and cause brake shake. then with minimal cuts on them I had to trash them after the third time resurfacing them same with the Minis. I know 3 cuts on rotors seems crazy to some but I have been able to cut my prelude rotors for the third time and they are still within spec. I machined my caliper brackets my self and I have not had a problem and I also re-drilled my rotors myself and I have not had an issue.
Four sets of pads and 3 cuts later my prelude setup works flawlessly.

If you have any questions don’t hesitate to hit me up.

btw I am also going to be running ep3 rears on my teg. I have the complete setup at home I am just waiting to get home so I can install and test them.
I will let you know how that goes lol

Sorry for this novel lol

Ah gotcha, my reacaros didn’t come with any rails so I’m forced to work with what I’ve got. The nearly $500 price tag for a pair of aftermarket rails with sliders left a sour taste in my mouth so I will just fab em up and spend the money elsewhere in my build.

I’m actually not sure about the usdm brackets and I don’t have any usdm lights to use to check it out for you. If I had to guess though I would say no since the design of the two varies so drastically.

Good info on the brakes and rotors. How much use has your car seen to need the rotors turned that many times? Has it been strictly track use or street driving too? I can definitely understand why they’d have a shorter life span then the prelude counterpart but I see rotors as being an expendable and frequently replaced item anyway so I have to admit I’m definitely tempted to go the mini route to avoid the necessary machining.

[QUOTE=HondaTom87;2310349]

Also if weight is any concern to you I was able to shave a total of 2 lbs off of my legend calipers.
I shaved the calipers and brackets with and angle grinder. [/QUOTE]
Be careful if you attempt something like this. Depending on where you grind and how you grind you could cause more problems than you’re solving. Removing material both removes the amount of heat the caliper can dissipate as well as reduces it’s structural integrity. If you remove too much material the caliper will actually flex under braking and it can cause decreased effectiveness and/or uneven pad wear. I’ve had remanufactured calipers which had been machined too thin and caused severe uneven pad wear. It took me forever to find out it was a problem with material having been removed from the caliper.

[QUOTE=HondaTom87;2310349]
Also the whole mini or corrado rotor idea works but becomes trouble some without proper ducting to the fronts. Yes the use of either rotor will allow you to not have to re-drill or order custom prelude rotors and will eliminate the need to shave the caliper brackets but the fact that they are thinner than the Honda rotors they do heat up much faster and are much more likely to warp. I had both the mini rotors and the corrado rotors on my DA and I hated them. I had to machine the corrados three times because they would overheat on me and cause brake shake. then with minimal cuts on them I had to trash them after the third time resurfacing them same with the Minis. I know 3 cuts on rotors seems crazy to some but I have been able to cut my prelude rotors for the third time and they are still within spec. I machined my caliper brackets my self and I have not had a problem and I also re-drilled my rotors myself and I have not had an issue.
Four sets of pads and 3 cuts later my prelude setup works flawlessly. l[/QUOTE]
Do you have any evidence of this happening to anyone else? You’re right that the Mini rotors are a little smaller, but for street use I can’t imagine this being a serious issue unless you’re trying to repeatedly resurface them like you did.I use the Mini rotors on my car which sees pretty serious abuse on track and I haven’t had any overheating issues whatsoever. With my old setup (stock sized brakes plus HP+ pads) I was cooking the rotors and pads. Now with the Mini rotors and Hawk Blues (race pads) I haven’t had any problems at all. Of course the race pads do help deal with the heat a lot better.

Sadly, I didn’t own my Recaro’s long enough to even mount them. Though my method was going to be the same as yours… Use stock rails/sliders, and make a cross-section to tie them together.

Looks like a lot of ideas are being tossed around. It’s nice to get feedback and have more than one route available.

I could have sworn I saw a picture of them installed in your car. I had to go back and double check your thread and I guess the picture I saw was just one sitting in place, not actually installed. Doh

I assume you’re just using the stock seat bases to save money, for a custom fit, or simply because its a fun project… But if you’re having problems or need to expedite things you can always go with PCI or Wedge Engineering. I’ve used both and had no issues with either setup.

I’m not familiar with PCI, but aren’t the wedge brackets a fixed position bracket? I guess I’m just fabricating my own rails to save some money since alternatives do exist. But at the price tag for aftermarket rails with sliders, I just can’t justify it since I can very easily fabricate them myself. I’m not even considering rails that don’t have sliders.

Yeah man, I sat a seat in the car… Never mounted them.

Yes Wedge make brackets with sliders available… they were just a bit more than I wanted to spend either. Custom ftw!

Wedge sold me Recaro sliders with my bases. Cost was about $80 for the base and $85 for the slider. But that was a cash pickup price since they used to be local. Prices may have gone up too, I’m not sure. My PCI setup was more like $250 but no sliders, not even sure how easily you could run sliders with that setup.

The big benefit to the stock setup is the oem look and functionality. The difficult part will be finishing all the parts to achieve that oem look. I’m excited to see how it turns out :slight_smile:

Yeah Wedge has Recaro brackets and sliders priced at $194ea for the DA. Ick!

Well that price is a bit better than the bride/memory fab ones I was looking at but still seems like a lot for what they are. It’s never cheap to pay for someone elses fabrication so I can say that I do understand why their prices are what they are. Couple their time with the limited demand and their price is much more understandable. I wasn’t aware that you could purchase the sliders from wedge too. At this point though I’ve already spent some time on the project and I’m confident I can finish them up and have them working as they should so I’ll just see the project through. I don’t know how OEM I’ll be able to get the finished design to be but all my welds and stuff should be hidden by the seat anyway so functionality/safety is my biggest priority.

Hey Michael,

here is a drawing I did to give you an idea (I think this is the way your doing yours) but if not then you can use this one. As you can see im not good with drawing but hope it helps.

Yep thats pretty much exactly the method I have in mind. Unfortunately the recaro bolt holes for the front two bolts fall right over the spring mechanism for the sliders so I’ll have to add an extra layer of metal in order to have it bolt together and they’ll have to bolt slightly inwards to clear the sliders. I’ll post more pictures as I get a little farther along with it.

Thanks for the pic!