S2000 Cluster Swap In 92-93 DA Integra

I know people have been waiting for this for a while so I figured it’s time to post it.

I’ve still have to get the Cruise Control wired up correctly but I will post that once it’s figured out. It will not effect the driving of the car.

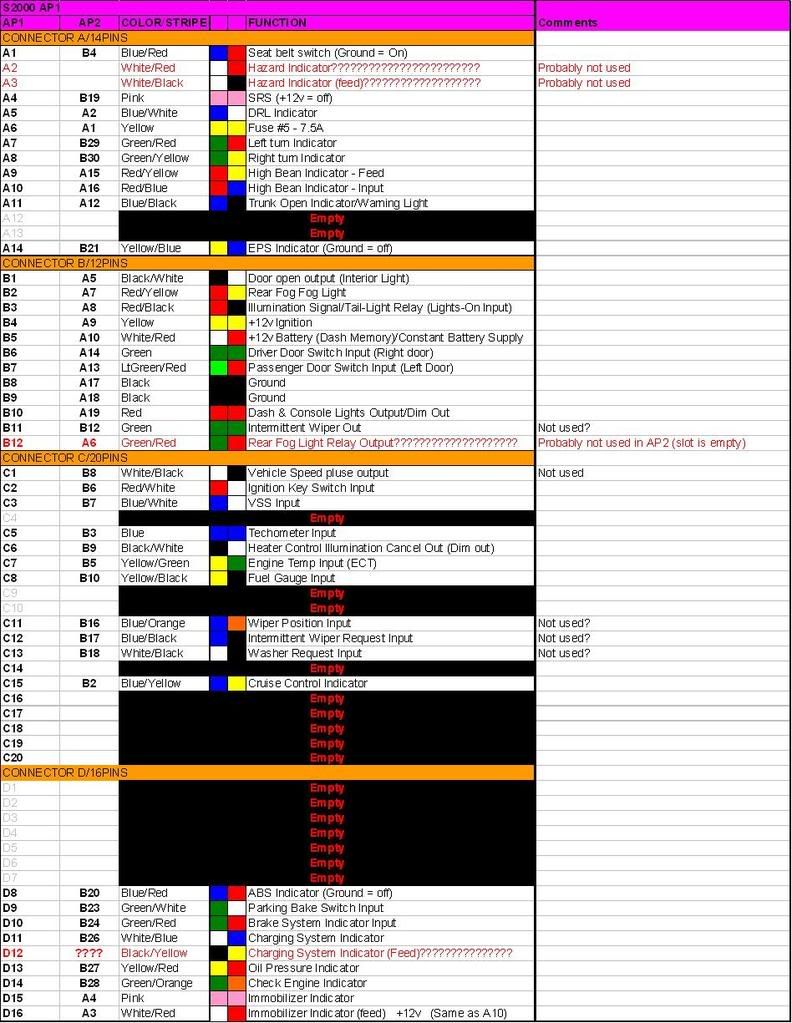
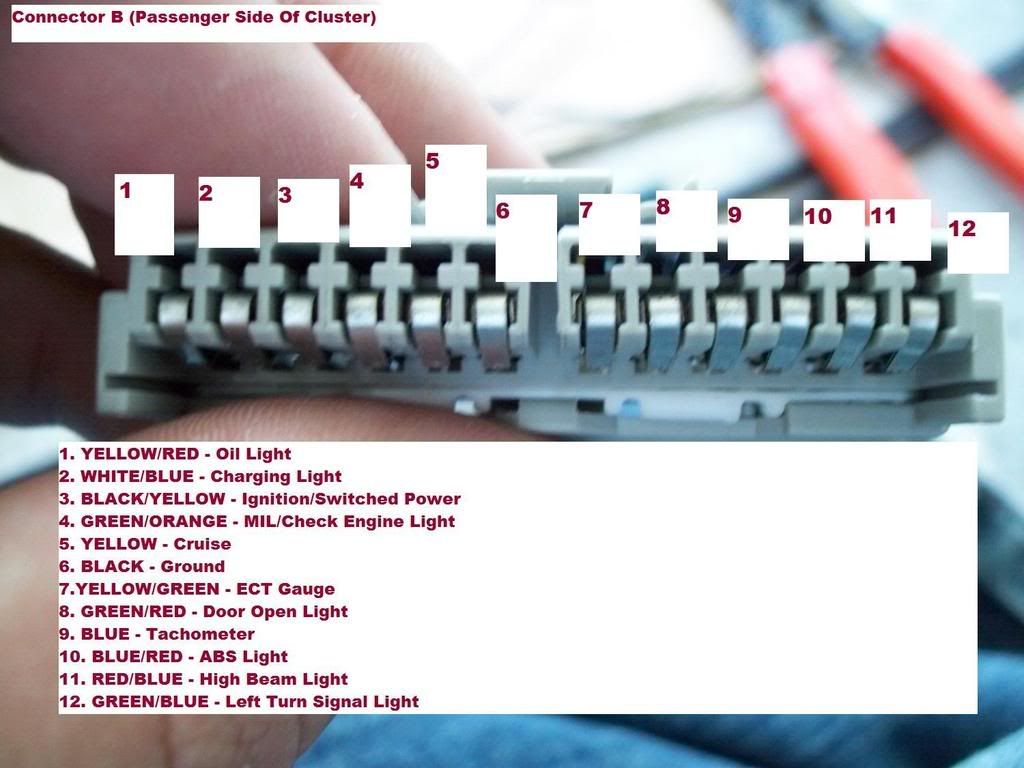
First and foremost, this write up covers wiring on a 92-93 DA Integra, there are some ECU connections made and I have listed ODB1 colors. I DO NOT know if 90-91 Integras have the same cluster wiring so those of you with the 90-91 Integras, you’ll have to get in there and see.

I will not be covering dash or cluster removal in this write up, there is enough info out there so just search it.

With the information provided this swap can be performed on any ODB Acura/Honda providing you can cluster pin outs for YOUR model and year.

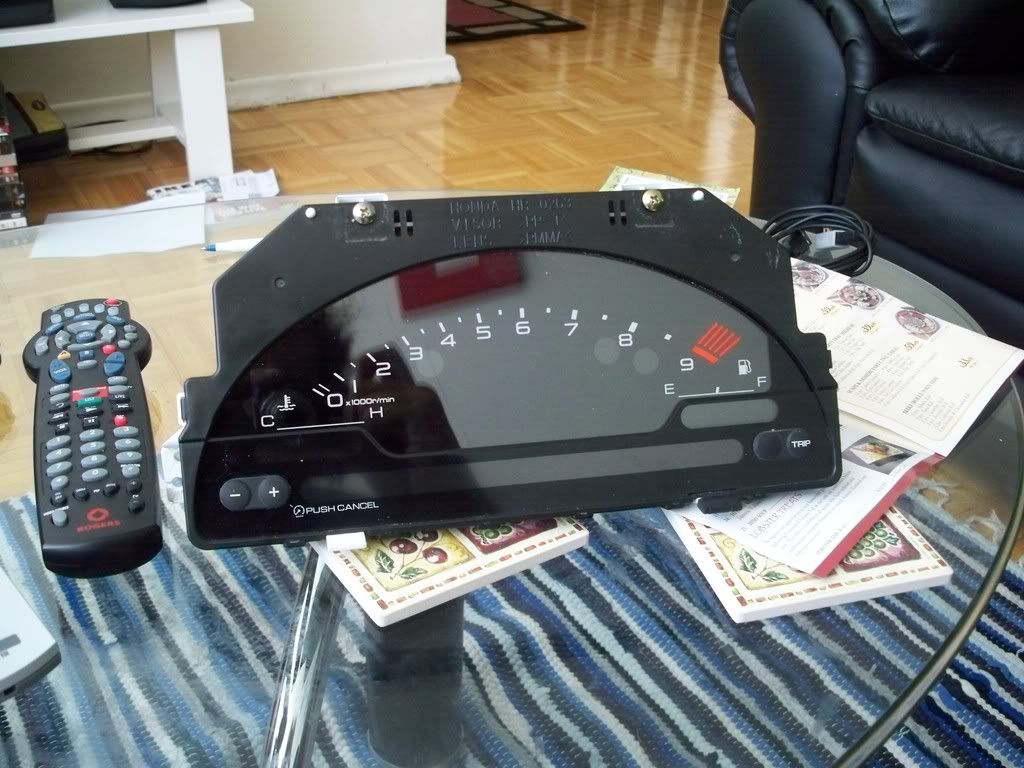
Lastly, this write up is for the AP1 S2000 cluster, what’s the difference between the 2, see the pictures below.

AP1

AP2

As you can see the fuel and engine temp on the AP2 are curved where as on the AP1 they are straight. The AP2 wiring is different too, the pin outs I posted have both AP1 and AP2 on them.

The next post will start to cover the parts and tools required.

The next post will start to cover the parts and tools required.

You need the following tools:

Wire strippers
Soldering Iron and solder
Heat Shrink
Heat Gun
Ring Terminal for the ECT gauge.
Some 18ga wire for wiring the ECT gauge.

Parts Needed:

AP1 S2000 Cluster and cluster plugs (you NEED the plugs) - Search the classifieds of various boards (JDMR, HT, etc), Ebay, S2Ki.com is good too.

Electronic Vehicle Speed Sensor from a 94-01 Integra - I bought mine for $50 from Teknotik. Try a junker. If you have a D series, use one from a 92-95 Civic.

Modifry Engine Coolant Temperature Converter - http://www.modifry.com/products/ect/index.htm

Speedohealer V4 (older versions will not work) - For Canadians: http://www.xtsportbikeaccessories.com/SpeedoHealer_HealTech.html?gclid=CNXZnPyH9pcCFSTaDAodpzuPCg
Everyone else, search for a dealer on Healtech’s web site: http://www.healtech-electronics.com/

Now it’s time for the actual swap.

I personally got a spare dash harness to do this swap. Here is the wiring pin out.

S2000 (AP1) To 92-93 Integra Cluster Wiring Diagram.

Connector A 14 Pins Green

  1. Blue/Red -------- Yellow/Red - Seat Belt Warning Light


  2. Pink - SRS Light -------- Black/Yellow - +12V will switch the light off since no DA came with air bags.
  3. Blue/White - DRL Indicator - Not Used (Canada Only)
  4. Yellow -------- Black/Yellow - Fuse 5 (Canada Only)
  5. Green/Red ----------- Green/Blue - Left Turn Signal
  6. Green/Yellow --------- Green Yellow - Right Turn Signal
  7. Canada: Red/White --------- Red/Blue - High Beam Indicator
    USA: Red/Yellow --------- Red/Blue - High Beam Indicator
  8. Red/Blue -------- Black - High Beam Indicator (-)
  9. Blue/Black ------- Green/Black - Trunk Open Indicator

13.---------
14. Yellow/Blue - EPS Indicator - Not Used

Connector B 12 Pins Grey

  1. Black/White -------- Green/Red - Door Open Output
  2. Red/Yellow -------- Black/Yellow - Fuse 45
  3. Red/Black -------- Red/Black - Dash Lights
  4. Yellow ------- Black/Yellow - Fuse 5
  5. White/Red -------- Black/Yellow - Fuse 25
  6. Green ------- Green/Red - Driver’s Door
  7. Light Green/Red ------- Green/Red - Passenger Door
  8. Black ----- Black - Ground
  9. Black ----- Black - Ground
  10. Red ----- Black - Dash Lights (-)
  11. Green - Wiper Relay - Not Used

Connector C 20 Pins Black

  1. White/Black - VSS Output - Not used
  2. Red/White -------- Black/Yellow - Ignition Key Switch
  3. Blue/White ------- See Speedohealer Wiring

  4. Blue --------- Blue - Tachometer Output
  5. Black/White - Heater Control Panel Illumination Cancel Output - Not used
  6. Yellow/Green -------- See ECT Wiring
  7. Yellow/Black -------- Yellow/White - Fuel Gauge (you must also tie the Green/Red - Low Fuel Indicator into this wire)


  8. Blue/Orange - Wiper Position Input - Not Used
  9. Blue/Black - Intermittent Wiper Request Input - Not Used
  10. White/Black - Washer Request Input - Not Used

  11. Blue/Yellow --------- Red/Black - Cruise Control Indicator


Connector D 16 Pins Black


  1. Blue/Red -------- Blue/Red - ABS Indicator (or ground if you don’t have ABS)
  2. Green/White ------- Green/Red - E-Brake Indicator (pins 9 and 10 tied together)
  3. Green/Red ------ Green/Red - Brake System Indicator (pins 9 and 10 tied together)
  4. White/Blue ---- White/Blue - Charging System Indicator
  5. Black/Yellow ---- Black/Yellow - Fuse 8
  6. Yellow/Red ------ Yellow/Red - Engine Oil Pressure Indicator
  7. Green/Orange ---- Green/Orange - MIL Indicator (Check Engine Light)
  8. Pink - Immobilizer Indicator - Not Used (possible to hook up to an alarm’s LED for shits? Dunno might have to try it).
  9. White/Red ------ Black/Yellow - Fuse 25

S2000 Cluster Pin Outs

DA 92-93 Integra Pin Outs

Here’s pictures of my wiring.


I HAVE OVER 20 HOURS OF WORKING FIGURING OUT THE WIRING

Solder the completed harness into your car. You can either cut your plugs off or leave them, I choose to leave them and I suggest you do the same.

Next we will move on to wiring the converters.

We’ll start with the Speedhealer and Electronic VSS.

Here is the wiring diagram for the E-VSS

The VSS is on top of the transmission, follow the speedo cable from the firewall down to locate it. Push down on the cable and pull up to remove it (if you didn’t when you pulled out your cluster).

There is a bolt holding it in place, remove it, remove the VSS and replace it with the E-VSS.

Wiring For the Speedohealer
Speedhealer V4 Wiring

Red -------- Ignition Power (I suggest the accessory ports in the fuse box)
Black -------- Chassis Ground
Green ------- Blue/White - Connector C Pin 3 On S2000 Cluster Harness
White ------- Yellow/White Signal Wire On Electronic Vehicle Speed Sensor

Next we’ll cover the Modifry ECT converter.

Now it’s time to wire the ECT converter.

Modifry Engine Coolant Temperature Converter Wiring

White -------- Red/White or Yellow Blue - ECU Connector D Pin 13
Green ---------- Yellow/Green Connector C Pin 7 on the S2000 Cluster Harness
Yellow --------- D19 on the ECU (ODB1, will get color tomorrow)
Brown --------- Ground For Alarm Output (to hook up a sounder or LED or both)
Gray ----------- Alarm Output Goes To Alarm’s Negative
Black --------- Chassis Ground

That about wraps up the wiring side of the install.

The next part is fabbing mounts and a plate to block off the gaps in the dash. This is something I am still working on (would you believe I’m having a hell of a time locating a piece of carbon fiber?)

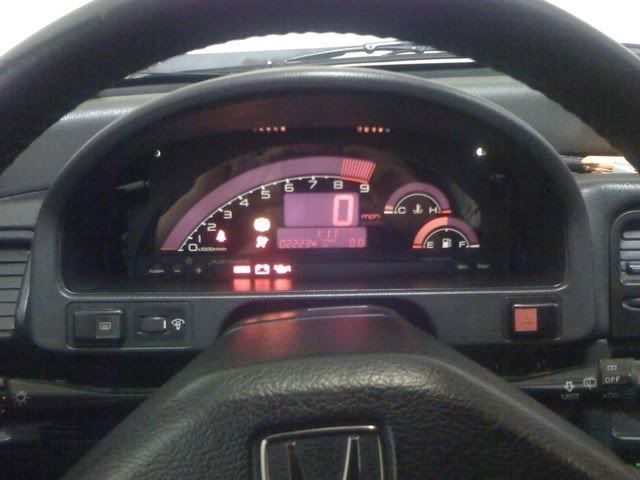
Here’s some pictures of the rough install and some early videos when I first did the swap, speedo wasn’t working at the time.

Day time
http://www.youtube.com/watch?v=YOpKGj75_0A

Night time
http://www.youtube.com/watch?v=2xUioLeCcKg

That’s it! Feel free to ask me any questions you might have.

Since I know it’s going to be asked, yes I will do the wiring for you. PM me to discuss it.

ENJOY!

thanks so much for taking the time and posting it…i been looking for this for a long ass time thanks

have you thought about cutting out a bezel? polished aliminum, carbon fiber, etc…?

the gap is unsightly, but everything else looks pretty unique. props!

[QUOTE=slackerintegra;1966446]have you thought about cutting out a bezel? polished aliminum, carbon fiber, etc…?

the gap is unsightly, but everything else looks pretty unique. props![/QUOTE]

It’s in progress. I’m having a bear of a time locating CF plate local to me.

I’m still rocking the GS-R cluster for now because of said gap.

What about using some Duramix 4040 (or the 3M replacement stuff, 3M bought them) to fill in the gaps. When I did the jdm itr cluster in my da, I used about a 1/2" off the end of the dc bezel, then cut enought off the back of the da bezel. Taped the piece of the dc one to the cluster, put the da bezel back on and tacked them together in the corners with duramix. Then took the whole piece out, put masking tape over the holes from the back side and filled in the gaps from the front. There is a lot of sanding involved to get it to all curve equally and look oem. But it’s worth it in the end.

Sick cluster swap btw.

I just like the blingy-ness of CF lol. I’ve thought about metal or fiberglass.

The thing about the duramix is that it’s plastic weld. It bonds to the bezels perfectly. Then do a mist coat of some texture spray and cover it with SEM black plastic paint and your good to go. Messing with fiberglass is messy as shit and would be a pain in the ass to do on that bezel.

Why not just buy a carbon fiber panel online
http://www.protechcomposites.com/
http://compositeenvisions.com/
http://search.ebay.com/search/search.dll?from=R40&_trksid=m37&satitle=carbon+fiber+panel&category0=

Shipping charges, duty fees and Canada’s crappy dollar.

http://compositeenvisions.com/ has some good prices. Looking around on the site I found some stuff I kind of like.

Bronze carbon fiber:

Red Carbon Kevlar:

Not sure which I like…

im stationed in germany and wanted to do the convertion but can you change the cluster to read in KPH?

Pressing the SEL button on USDM or CDM clusters will change between MPH and KPH.

Mine only reads KPH because it’s a AUS cluster.

thanks

wow that’s awesome!!
good work from a fellow Canadian :up:

Thanks for the help on mine man!! I didnt need the S2K plugs though. I’ll show you the finished product when I’m done. Great work

Yours is going to be easier with the K swap.

Hurry up and finish the swap so you can share your knowledge with me lol.

hey if you need a peice of just plain ole’ carbon, i can get you some or you can just order it yourself.

http://www.mcmaster.com

search carbon fiber. we sell it in sheets and its pretty solid.

actually if you want to order it email me red.integra@gmail.com i’ll hook it up for you. its NOT as flashy as the stuff in the pics you posted, but i think i can score you a sheet 12x12 for like 13 bones