Teg Tip: Idle Air Control Valve (IACV) Removal/Cleaning Procedures...

[u]NOTES FROM THE AUTHOR[/u]

Well, BR explained it pretty simply. So, when I was able to rent the digicam the other day, I decided to clean the IACV and post it up. This is pretty straightforward, with the coolant lines being the only hassle (probably because I’m just too weak :frowning: ).

[u]CREDITS[/u]

BR - Well, he opened the doors and pretty much explained things very well. :up:

[u]INTRODUCTION[/u]

Task: Idle Air Control Valve (IACV) Removal, Installation, Cleaning
Difficulty: Easy
Time Required: Actual work is 30 minutes. Drying time is 3 hours depending on your preference.
Engine Used in this Guide: 89-91 B16A
Engines Applicable: Other B-Series engines will differ, but the idea is basically the same.

[u]TOOLS REQUIRED[/u]

  • 3/8" Ratchet
  • 3/8" 12mm Socket
  • 12mm Closed-End Wrench (if Ratchet is not available)
  • Assorted Long Nose Pliers
  • Carb Cleaner (readily available at your local Automotive Store)
  • Towels
  • Air Compressor
  • Compressed Gas Can such as “Dust-Off” (used for computers) can be substituted if Air compressor is not available.

NOTE: If the pictures do not show, click here for the album: http://www.imagestation.com/album/?id=4291328805

[u]STEP 1[/u]

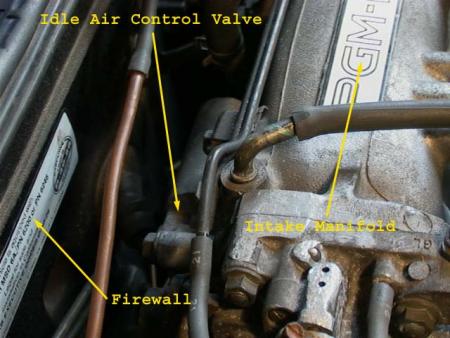
Figure 1 shows the location of the IACV. Get yourself familiarized with what you’re about to do. NOTE: It is highly recommended that you do the work with the engine COLD.

Fig. 1 - IACV Location inside Engine Bay

[u]STEP 2[/u]

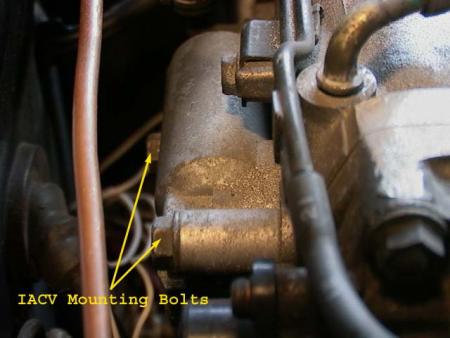
Take a 12mm socket or wrench and remove the bolts shown in Fig. 2. The IACV will simply detach itself from the intake manifold.

Fig. 2 - Remove Mounting Bolts

[u]STEP 3[/u]

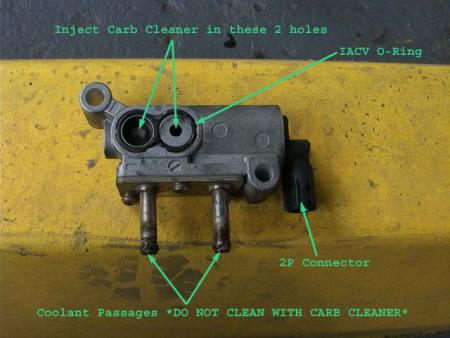
Once the bolts are removed, you need to remove the 2 coolant hoses and the 2P Connector from the IACV. Use long-nose pliers to loosen the clamps that hold the coolant hoses tight. Fig. 3 shows the IACV removed from the engine and I have highlighted the items for clarity. Be careful not lose that O-Ring!!

Fig. 3 - Where everything is

[u]STEP 4[/u]

Refer again to Figure 3 in Step 3 for reference. Take the Carb Cleaner and liberally spray the inside of the 2 holes shown in Figure 3. It may be best to remove the O-Ring if possible as I noticed that the Carb Cleaner SWELLED the rubber. However, the swelling should subside in a couple of hours. Once you are finished with the Carb Cleaner, take the Air Compressor and inject compressed air in the holes to dry.

What I have done is this: Spent approx. 30 seconds per hole injecting it with Carb Cleaner. Then spent 2 min. per hole with the Air Compressor. I then flooded the 2 holes with Carb Cleaner again and laid it down on the ground as shown in Figure 3. I left it soaking like that for approx. 1 hour. After which, I pumped the air compressor again to dry it. Just to be on the safe side, I left it to “natural dry” for 2 hours before installing it back on the engine.

[u]STEP 5[/u]

Installation is reverse. Do not mix the Coolant hoses around. Although, I do not see any forseeable damage if you do (just be on the safe side, though). Don’t forget the O-Ring gasket. That is quite important if you want to minimize air leaks. Take your baby out for a spin!

[u]CONCLUSION[/u]

As far as I know, the IACV does not operate unless the engine has reached normal operating temperatures. Until it does, the Fast Idle Thermo Valve does the work. Again, I could be wrong. In any case, it is better to test the IACV while the engine has completely warmed up.

My bouncing idle has been fixed previously. However, I have noticed I feel less vibration in the cockpit during Idle after this maintenance.

If you have any questions, either post 'em here or email me at the_oz@hotmail.com

Regards,

Oz

iacv1.jpg

iacv2.jpg

iacv3.jpg

Nice write up on that one. You just saved me tons of typing (that is if anyone checks the teg tips anymore).

Later,
BR

good job. ya if you dont do it while its cool, be prepared for some cursing and burnt knuckles, especially if you drop the iacv connector.

my advice is to get a string and tie it around the connector before you disconnect it, cuz it can drop all the way down to the crossmember.

thank you! Pictures really do say a thousand words!

i found that even after using a ton of carb cleaner and spraying it out, spraying in some simple green afterwards got a lot of gunk out as well. i think carb cleaner sux for cleaning. i think its only used cuz its easily combustible.

Awesome write up. I’ve been meaning to do this for a while now, and maybe I’ll actually get around to it tonight due to my bouncing idle…

Thanks guys. :up:

i would like to add that the bottom of the IACV, where the coolant passages are can be unscrewed and cleaned aswell.

while cleaning my IACV i removed this piece and discovered that the coolant had caused a bit of corrosion in the square shaped passage behind the plate and also all on the inside of the actuall tubes. leaving the corrosion will reduce the flow of coolant to the IACV.

i cleaned it out with a small piece of fine grit sand paper wraped around a thin round metal, such as a small screw driver.

Originally posted by Speeddaddy
[B]i would like to add that the bottom of the IACV, where the coolant passages are can be unscrewed and cleaned aswell.

while cleaning my IACV i removed this piece and discovered that the coolant had caused a bit of corrosion in the square shaped passage behind the plate and also all on the inside of the actuall tubes. leaving the corrosion will reduce the flow of coolant to the IACV.

i cleaned it out with a small piece of fine grit sand paper wraped around a thin round metal, such as a small screw driver. [/B]

ya me too. when i disassemble something, i really go at it until either something snaps or i cant figure it out hehe

None of the pics work here, or on imagestation.:uhoh:

I’ll try and fix it at work tomorrow. Sorry for the inconvenience fellas.

Regards,

Oz

Hey, maybe I missed it but is there any way to get the screen out? the air wont hurt it will it?

Ben

Originally posted by Ben Ogle
[B]Hey, maybe I missed it but is there any way to get the screen out? the air wont hurt it will it?

Ben [/B]
Hey Ben, I have never tried to take a screen out of one before, but the air wont hurt it if you blow it in it.

Later,
BR

ok, cool. Thanks chief.

Ben

thank you so very much

The_Oz can i use your write on my site ? credit will definately been given to u and br :bow:

What about that hex head scre/bolt in the end…can that be removed as well…I have looked everywhere to find the right tool…NO LUCK!

My secret (well, no longer) cleaning ingredient is Hopp’s “Nitro” cleaner used for firearms. If you could only see my living room, I have all kinds of parts laying around. I was cleaning my .45 one night and thought hmm, I’ll try some of this stuff on my block…yup eats that grease right off and eats the carbon build up on the exhaust ports right off, and leaves a clean shiny surface. Worked way better than carb cleaner, and doesn’t eat up rubber and plastic like some other cleaners do since a lot of firearms are made of polymers now a days.
-Wes

Great tip, it helped me out alot, thanks!

very very nice write up, im going to clean mines this weekend. Thanks!

Re: Teg Tip: Idle Air Control Valve (IACV) Removal/Cleaning Procedures…

Originally posted by The_Oz

Ok,

My problem was a bouncing idle while moving and sittting still.

I cleaned the IACV, replaced the TPS, O2 tests good, and adjusted the idle.

Now the idle only bounces when the car is moving!!! WTF!!

Ideas? Just plus the holes in the intake I guess…

:mad: