Finally Getting My Turbo Set Up Going

Thanks. Sweet man, good luck. I did a bunch of head work on mine last year and learned a lot in the process. One thing I’ll say, lapping valves is a pain in the ass. Getting the suction cup to stick to the valves for more than a few seconds is not easy.

Sooo some updates on the exhaust. I’ve been slowly working on it and getting it closer and closer to being done. I finished up the middle section today in class.

vband flange that connects to the flange on the downpipe

Hanger. I set it up to be underneath the pipe and added supports to help secure it

Bottom side

This is why I wanted the supports. This weld wasn’t very big because the contact point with the pipe was small

Vband flange that will meet up with the flange on the final section that goes over the rear lca (have yet to make that last section). I made this weld a bit wider. I wanted to wiggle the cup a bit and see how it turned out. I like the way it looks

A couple 90 degree bends to get around the gas tank

And the whole middle section

I’m confused about something, maybe someone can help me out. On my db1 there is a hanger for the exhaust right before it goes over the rear lca. On my da (the car this exhaust is going on) there isn’t a hanger in that spot. No sign of one ever being there either. I know I’ve seen photos of da’s with a hanger there so I don’t get why it’s missing on my car. Maybe the rs models didn’t come with one. It sucks cause I don’t have a way to support the exhaust back there. That is a lot of weight hanging off nothing but the welds =[ I’m going to try and figure out some way of getting some support for it. Not sure how yet though.

I’ve got to order a few more pieces and then I’ll get going on the last section of this thing =]

Exhaust is coming out great! Very nice work!

I checked my 93 RS for you and it has the hanger right before the LCA that you were mentioning. Yours is missing completely? No evidence of it tearing out or breaking off? I would definitely suggest welding a new one in to support that section of piping. Like you said, that’s a lot of weight to be supported only on the welds.

[QUOTE=rollinmyda;2326679]Exhaust is coming out great! Very nice work!

I checked my 93 RS for you and it has the hanger right before the LCA that you were mentioning. Yours is missing completely? No evidence of it tearing out or breaking off? I would definitely suggest welding a new one in to support that section of piping. Like you said, that’s a lot of weight to be supported only on the welds.[/QUOTE]

Thanks man. See, I knew they had one back there =[ Mine doesn’t show any sign of one ever being ripped out or removed or anything. That’s what’s so weird about this. I don’t get it. Is there any way you can take a photo of yours so I know exactly where to look? I’ll check that out and then post a photo of that spot on my car and show how the spot looks on mine. If I had my own welder at home I’d just add a hanger on like you suggested. Unfortunately I don’t, and I can’t bring the car up to the school where I do weld to do it. It doesn’t hang down without that hanger being there, it just moves left and right. I’m going to have to live with it for now. I’ll make the other hanger back there kinda pull on it and make it tight so it holds everything. I will probably take the car to a friends shop (once it’s running well enough to drive) and then add a hanger on

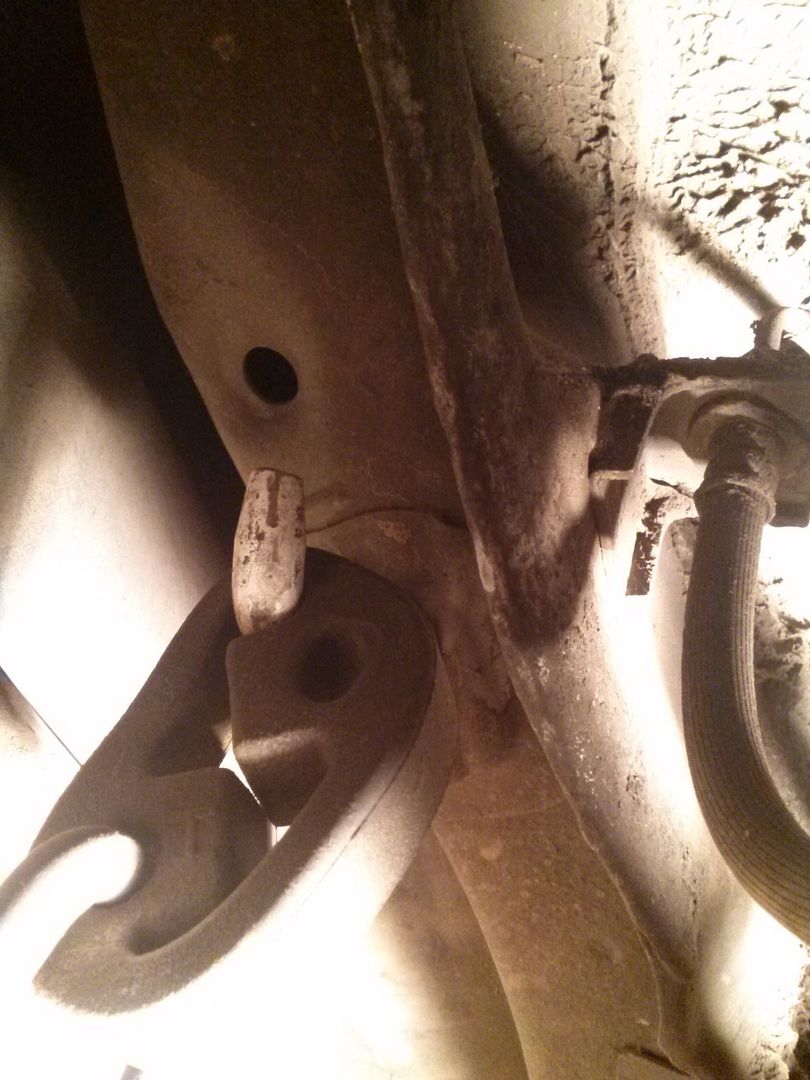
Here’s a picture for you. It’s right behind the brake line on the other side of the frame but you can see it hanging down. Hope that helps!

Awesome man, thanks for posting that. Here is how mine looks, I couldn’t get the same angle photo as you cause I didn’t want to take my tire off.

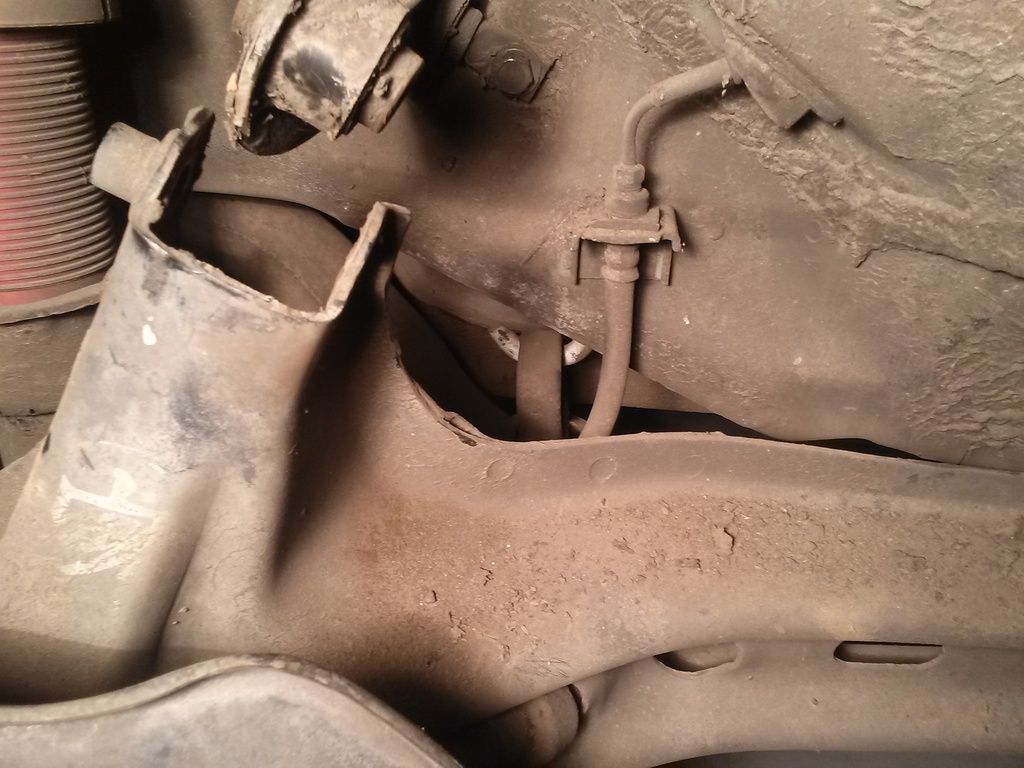
You can see the brake line on the right side (circled in red). Blue thing is the camber kit, and in bottom left corner that’s the edge of the gas tank. Just mentioned that to help give perspective since the photo is a weird angle from underneath. The red arrow points to that little um, pressed out line in the metal underneath that open hole. (ignore the scratches in the dirt I did that).

That weird line that is pressed into the metal and the hole that’s in front of it is all I have in the spot where the hanger should be. Unless it was where that hole is I see no signs of it ever being there. I’m wondering if that line in the metal is a mark for where it was supposed to be added on in the factory and for some reason it was never put on…who knows. I wish I could remember if there was a hanger there when I pulled my rsr off, but my memory sucks. Oh well though, I’ll get one added on once I can get the car up to my friends shop. I’ll just continue on finishing the exhaust without it for now. The other hanger behind the lca will support the weight for now. I only have 3 weeks of class left (6 classes total since it’s only on mon and wed) to get this last section finished. After that I have no welder so hope I can get it done. I’m not sure how I’m going to run the pipe out of the bumper yet. It’ll still come out the stock spot, just not sure if I’m going to go straight out or at a slight angle. Depends on how it looks, but I’ll try some different angles and straight out to see what looks best before I do it for sure

Thanks again for posting the picture

Wow, yeah it looks like your car never had it. I took a better picture from the bottom like yours and you can see the hole and line but my car also has a welded in bracket with the hangar that your car doesn’t have. Ignore the way the rubber hangar is oriented, lol. I have no idea why it was like that.

LOL yeah your hanger is not in the correct hole there…sorry couldn’t ignore that. That’s a much better picture though. Guess the guy in the honda factory in charge of hangers took a long lunch break and forgot to put it on when he got back. :shrug: Oooh well, like I said I’ll get one put on at some point.

Got a bit done today. I started on the part that will go over the lca

^All that crap on the edge of the flange is just the sticky residue from the aluminum tape I used for back purging. It’ll come off with some goof-off

I’m going to test fit it tomorrow and see how the next pieces need to be

Got a bit more done the other night. The parts that needed to be added to get up and over the rear control arm are welded on now.

Looks weird cause it’s not sitting in the position it will on the car

Here is how it sits when it’s on the car. The two piecuts at the end of the pipe were needed to allow the next pipe to be perfectly straight and parallel with the ground like the sway bar is. I’ve got the hanger made as well, just need to weld that on when I go into class on Monday.

Now that I know all of that will work and clear the sway bar and everything I moved on and started designing the last piece. I’ve been using 3" cardboard mailing tube this whole time when designing each piece. Stuff works out great for helping me get things right before cutting any actual metal. Anyway I got it pretty much how I want it. It’s at a slight angle, but nothing crazy. Coming straight out looked stupid and although it looks like it sticks out a lot it’s actually flush with the bumper which you can see in the last picture. I think it’s gonna look sweet when it’s done. Hopefully it wont burn my bumper or get black shit all over it, but I’ll see. I don’t want to do a turn down at the end even though that would help avoid those potential problems because I those look like limp dicks lol. Just looks weird

I should be able to finish it up next week =] Fingers crossed cause I’ve only got 4 more classes including next week and then after that…I have no welder

I welded the last section together today. Didn’t get any pictures, but I did get a quick sound clip of it on the car though.

//youtu.be/V8ioEbyfW5U

Last thing is too weld on the last hanger tomorrow and it’ll be done =]

So today I welded on the last hanger and had some fun with a blow torch and make a ricer mod…

I decided to see what it would look like if I burnt the tip and I think it looks sweeeet!

Unfortunately though everyone said to add clear coat or else it will eventually wear off. I listened, added some high temp clear…and watched the intense colors fade away to a dull, boring, blah look =[

//youtu.be/gsl2TnVqALw

VID_20150429_225940_edit_0.mp4 - YouTube

The clear coat basically removed all the intense blues and left just the dull purple. Adding the clear coat might help it last longer, but it makes the colors way too sedated. I’ll wait and see what it looks like in the sun tomorrow, but I have a feeling I will be redoing it…the burnt tip that is, not the exhaust. That came out great. Sits exactly how I wanted it

Great job!

Sooo it’s finally finished. I ended up redoing the burnt tip and got some blue back in it. It still didn’t come out as intense, but I like it cause it’s just enough without being overkill.

Here are the last of the photos of it

Hangers

How the last section sits

And how it looks on the car

Went and drove the car for the first time with the new exhaust on and I think it sounds amazing. Sounds way better than I imagined it would. Super deep tone, no rasp, nice and quiet when I’m cruising around. I’m surprised it’s as quiet as it is with no cat, resonator or muffler. Couldn’t be happier with how it turned out. Can’t wait till the car is tuned and I can hear it in boost

Messing with the launch control settings

Rev Limit - 5000
Activation - 4800
Fuel Enrichment - 20
Timing Retard - -10

With these settings it’s building between 3-5psi

//youtu.be/nli_pj3RwGA

Update on how the car runs. I didn’t actually go get it tuned, but the guy I was going to tune with in Houston was nice enough to help me out even though I couldn’t get the car down there. He had me make a number of datalogs which he would then view and make adjustments to my map, then send the revised map back to me for more testing and datalogging. All in all it didn’t take many logs, after doing that about 5 times he got my car running GREAT! The air to fuels are damn near spot on everywhere. Idle and cruising is right around 14.7 and in boost it’s between 11.4-12.0. As for the timing he kept it within a safe limit and once I get new plugs he wants me to do a pull, shut the car off, and send him photos of the plugs to check timing. The car really is running excellent. I can’t thank Tim enough for helping me out, and being able to tune the car without ever actually seeing it in person.

Oooh, so little thing we noticed while doing these datalogs. I for the longest time thought I was running 6psi since that’s what my gauge said and the spring I was running was a 5.8psi spring. Well turns out I was only on 3.5-4psi =[ That’s the highest Hondata was seeing. I figured I had a boost leak, but ruled that out after testing. We basically attributed it to my wastegate spring being meant for an mvr and not a 38mm like I have. Well a friend of mine gave me his spare springs to try out. They were still for an mvr, but this time I used 2 springs. A small white and a large plain. After doing another datalog I’m not hitting the boost I want. I hit 6psi pretty early, but as I get higher in the rpm range I start to creep until I max out at 8psi. The clutch seems to be holding without issues so I’m happy with that power for now. =]

Got the rolling anti lag working. I’ve got it wired to the “mist” feature on the washer stalk. I pull it back to activate the anti lag, wait for boost to build and then let go and it takes off

//youtu.be/at9MXnzvFtw

Amazing sound. So hows the performance after the installation of the full muffler system?

Sounds great, I’m loving the build:clap::clap::clap:

Thanks, as far as sound…ITS SO LOUD lol It’s nice and sutble until I get into boost and then it screams. My friend filming my runs from last weekend said he went deaf…oops. As far as performance, don’t know if it’s any better than when I was just on the open downpipe. I’m on a different tune now and more boost so hard to say

Thanks

Video of my runs from last weekend. (Only posting the link not embedding it because I don’t wanna get in trouble by admin for posting street racing videos)

Me vs an old sentra with an sr20det swap with a t28 on 11lbs, I was on 8lbs (40 roll)

60 roll

And me vs a turbo kia and a 350hp 20g bmw (don’t know what kind of bmw…old e series)

Car is very loud when I’m on it.

Annnnd sadly, this car just became my daily for right now =[ My beater db1 sprung a coolant leak and it appears to be a crack or pinhole in the water jacket pipe that connects the water pump and thermostat housing. Which sucks. It’s like $41 from acura which isn’t bad, but I wont have the part in before I go back to work on Tuesday so the da will be my daily next week. I hate to drive it in the rain and during rush hour traffic, but I’ll do what I gotta do I guess. Daily on e85 is gonna suck as well

I keep watching the anti lag videos over and over. that sound is pure sex. awesome build man.

Lol thanks man. I appreciate it

Forgot to post this video from last Sunday when we had some more fun…

So I got my new clutch in a few weeks ago. Got a Clutch Masters FX350. I shouldn’t have any issues with this one slipping past 8lbs.

Then some friends and I pulled my trans last weekend. Btw, never doing it like this again. I would much rather just pull the whole motor

When I pulled the old clutch off I was surprised by the fact that it was still in great shape. There wasn’t a single hot spot on the flywheel or the pressure plate. They even still had the grooves in them fron when Exedy surfaced them in their factory. It did only have less than 10k miles on it, but for as much as I beat on it this little oe Exedy held up really well

Here is how the old stuff looked

Flywheel (Exedy 9.5lb)

Pressure plate (exedy oe style)

You can see the grooves still in it.

I put some new hondabond on the crank end plate thing and put in a new oem rear main seal

I didn’t even bother resurfacing the flywheel because it was in such great shape. I just put a new pilot bearing in it and threw it back on

Then I put the new Clutch Masters kit on

All of that went easy, then the issues started happening. Trying to get the trans back up and lined up was damn near impossible without scratching everything up and clunking it into everything. Never again will I do a trans this way. I will just pull the motor like I did the last time. Much easier that way. So once we struggled to get it up and on I ran into another issuel. The bolt on the top in the front ended up stipping the threads out of the block so it will no longer tighten…this caused the trans to have a small gap at the top in between the trans and the block =[ Oooor so I thought that was what caused the gap…

You can see the gap here, and the scratches on the trans =[

So after everything was back together I said ok there is nothing I can do about that gap right now so I’ll leave it and see if it effects anything. Well right when I put my key it I threw a cel for coolant temp sensor. I thought that was strange since I’ve never thrown that code before. I checked the connector on the head and it was in. I then traced the wires back and noticed that the wires for that temp sensor were caught in between the trans the block…FAIL! So that is the cause of the gap, not the threads being stripped for that bolt. I tried everything I could to get the wires out, but realized that without taking everything back off and wiggling the trans back there was no way to get those wires out. So I did what I had to do cause I was no about to rip my car all back apart less than an hour before the meet. I was determined to not have to drive my daily lol. I cut decided to cut the wires at both ends where it was pinched and make new wires to run to the coolant temp sensor. That solved the problem. Sucks I have that gap in there, but I drove the car and I’ve put 50 miles on the new clutch without issues from it. Car is acting normal and still drives perfect. I’ll have to fix that bolt that wont go in at some point, just don’t know how to go about it yet.

So as for how the clutch itself feels. They lied when they said it feels like stock lol. My leg is going to get BIG from using this thing. It might be the Hasport conversion kit that’s making it stiffer than normal, but idk it’s pretty rough. It also engages super close to the floor. It’s like an on off switch. I lift my foot less than half an inch and bam it’s fully engaged. I adjusted the cable in both directions to see if I could get it to engage higher, but with no luck. It’s either too loose and wont let me get into gear, or super tight and engages right at the floor. I’ve already stalled it out a few times cause I’m not used to it being so grabby. 'm hoping it will get better once it’s broken in, but I guess I’ll wait and see. As for how it grips…it grips like a beast. For me not getting on it or even pushing it yet it grabs way harder than the old exedy I was using. It’s an instant grab too, no hesitation or wait. It grabs and you know it immediately.

Anyway I’ll post back once it’s got it’s 500 mile break in done and let you know how it feels then. In the meantime I’ll leave this quick photo I took today while taking some photos for a friend