My seat setup will be Recaro Speed/Recaro sliders/ weaponR seat brackets. I’ll see I’d I like the height of the brackets, if not ill find another set or fab my own.
Worked onthe mounting brackets some more, I’ll have pics up later.
My seat setup will be Recaro Speed/Recaro sliders/ weaponR seat brackets. I’ll see I’d I like the height of the brackets, if not ill find another set or fab my own.
Worked onthe mounting brackets some more, I’ll have pics up later.
Here’s my finished b pillar mount ready to be welded up.

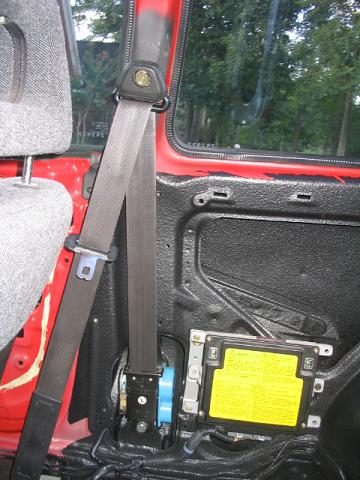
And here’s my lower reel mount. Yes I know it’s the left side belt on the passenger side… it’s just for mocking up the plate.

Looks good! Be sure to grab some pictures of the welds I’ll let you know if they’re good ![]()
As for that lower reel mount, see if your weldor can also get in there and weld down the plates where I made the red lines:

Yea That was the plan but after seeing the area, the metals sort of irregular back there. So I cut the plate shorter and figured the 3inch weld across the front should be plenty. I can see what he can do though. The force on that peice would be vertical, so it should be good.
This project is looking great man! Can’t wait to see some more progress. Subscribed ![]()
I came across this when I was doing research as to how others have done the conversion and I thought that this was a good idea. It appears that this bracket is a “L” shaped bracket then welded to the body.
This build is awesome so far! Subscribed.
Yea I have that picture, I believe it’s from darin d’s car. Somewhere in a thread he said there was a bend and it was welded down the back as well as the front. Looking at it with the plate in place looks like it might be easier said than done. I talked with Colin a bit about it at we both agreed a weld across the front should be more than sufficient with the load on the reel being vertical. I’m going to ask my welder to try to get at the back but if he can’t I won’t sweat it.
Small update coming when I get these picture loaded.
Well I skipped ahead a bit today and ordered the fabric I’m going to refinish some of the interior with. Authentic Recaro jersey material in red, black and gray. Thatll be to do various things like the door inserts, armrest, headliner, pillars, sunvisors etc.
Got the plates almost perfected for mounting my manual belts. Still a little trimming to do.

Test fitting the armrest to fab the lower brackets, found out the WeaponR seat brackets don’t wanna fit at all.

Gonna clean this up, use some rust converter and lay down some Raam Mat.

Little side project…Hmm wonder what this could be for?

Mid workday bumps. Thanks for subscribing guys, glad you like the build so far.
I hear what you’re saying with the direction of force, but I would really revise that if I were you. I certainly wouldn’t trust a 3" weld like that for my seatbelts, and I’m a weldor. You can make an “L” shaped piece like dpintos said, I just checked my DA shell, and there is definitely room to get a MIG nozzle, or even better a TIG torch in there
The original plan was an L shaped piece, I couldn’t manage to get the bend right because nothing behind there is flat. So I cut the mangled bend off. The plate extends down to where the bend would be, so there is overlappIng metal and not just a butt weld. I could get more steel and try it again but I know I can’t get that bend right…
Thinking I’m gonna buy a welder myself and get to practicing. Turns out my guy is gonna be out of town for a few weeks and won’t be able to get to me before he leaves.
Don’t worry about getting that bend right. As long as you have enough steel to make it and you’ve cleaned off the paint to weld, you can actually use a hammer or dolly and beat the steel down to the right angle.
If you do decide to get a welder, stay away from Harbor Freight’s flux cored machines. Get a little Argon/C02 bottle and a cheap Lincoln, Miller/Hobart, etc… If you need any help, post up here and I can guide you in the right direction. Also check out honda-tech’s weld/fab section, weldingtipsandtricks.com, and weldingweb.com for some reading
Yea I was looking at a Hobart Handler 140, it’s between $500-600 so it might be a bit before I can pick it up.
I’m just gonna put the mounts aside for now and work on getting the rest of the suspension together I think.
First bit of Recaro fabric came in today.

Cleaned up the interior a bit today. Got some more cleaning to do and going to apply some Eastwood rust converter and encapsulator to treat some small spots inside before I order the Raam Mat and Ensolite to do some deadening. Rest of the Recaro fabric should be in tomorrow or Tuesday. Planning to order a pressure washer and some Eastwood or SEM undercoat to refinish the wheel wells before I start putting the suspension back together.
Next up from the dealer is going to be a brand new rear subframe, Front LCA’s, front wheelbearings, rear trailing arms, compensator arms (or maybe SPC toe adjusters) and all associated hardware…plus some more hardware for various other things.
Looking good Jordan ![]()
Nice, yea the Handler is what I was going to suggest. Also any Miller in the same size will be the same machine (same company now). Check out your local craigslist, there’s always some cheap machines on there! And if you did decide to pick up a welder, learning how to properly put down a bead will come in handy you’ll find ![]()
That fabric looks pretty snazzy though, I like!
If you’re going to be lowered though, I’d suggest not getting complete new trailing arms, unless you feel like pressing out the TA bushings and re-clocking them. Everything else on that list looks good to me!
I have a set of Mugen Hard rubber RTAB’s around somewhere. I’m just gonna slap the new RtA’s on, get the stance setup and mark the angle to clock the bushings, and then pull the RTAs off and throw the Mugens in. No big deal.